I promised an update when I transplanted seeds… I’m a bit late since I actually did this almost 3 weeks ago. I did save the pictures though, so I can still run through that bit. My daughter is at school and I didn’t want to be covered in joint compound and drywall dust to go pick her up, so I have almost an hour to write! 🙂
So seed starting next steps…
We drink a lot of bottled water and Gatorade which comes in plastic bottles and yes, I know, it’s terrible for the environment- but, I reuse mine for all sorts of things instead of just tossing them in the trash. Seed starting time for instance, I save bottles for several months and use those for my transplants instead of buying seed starting kits at the store. It saves money and it helps recycle many of those bottles that would otherwise wind up in trash. Clear plastic bottles make excellent seedling starters for several reasons; they are thin enough to cut through with household scissors and don’t require special tools, they hold water well without disintegrating like paper pots or peat pots, they are the ideal size for individual seedlings, are easily transportable if you’d like to give some plants away (which I do every year) and best of all, you can actually SEE the root development on your plants. There’s no questioning whether the root systems are well established and ready to plant, all you have to do is take a look. It’s also fun to be able to show my daughter all parts of the plant so that she she can see how they grow, not just the leaves and stems above ground, but all those essential roots too.
1) I prefer the 20 oz. Gatorade bottles for my transplants, but I use 17 oz. water bottles as well. The Gatorade bottles have a wide mouth, so I take the tops off, cut the bottle just above the label and turn the top upside down inside the the bottom. (Like in the photo) I filled both the top and bottom with soil. I’ve seen some gardeners cut the bottle closer to the middle, put soil only in the top portion with the roots sticking out the mouth and use the bottom to fill with water- makes a sort of self watering planter.
The water bottles I just cut the tops off above the label and only use the bottom 3/4 of the bottle as a container.
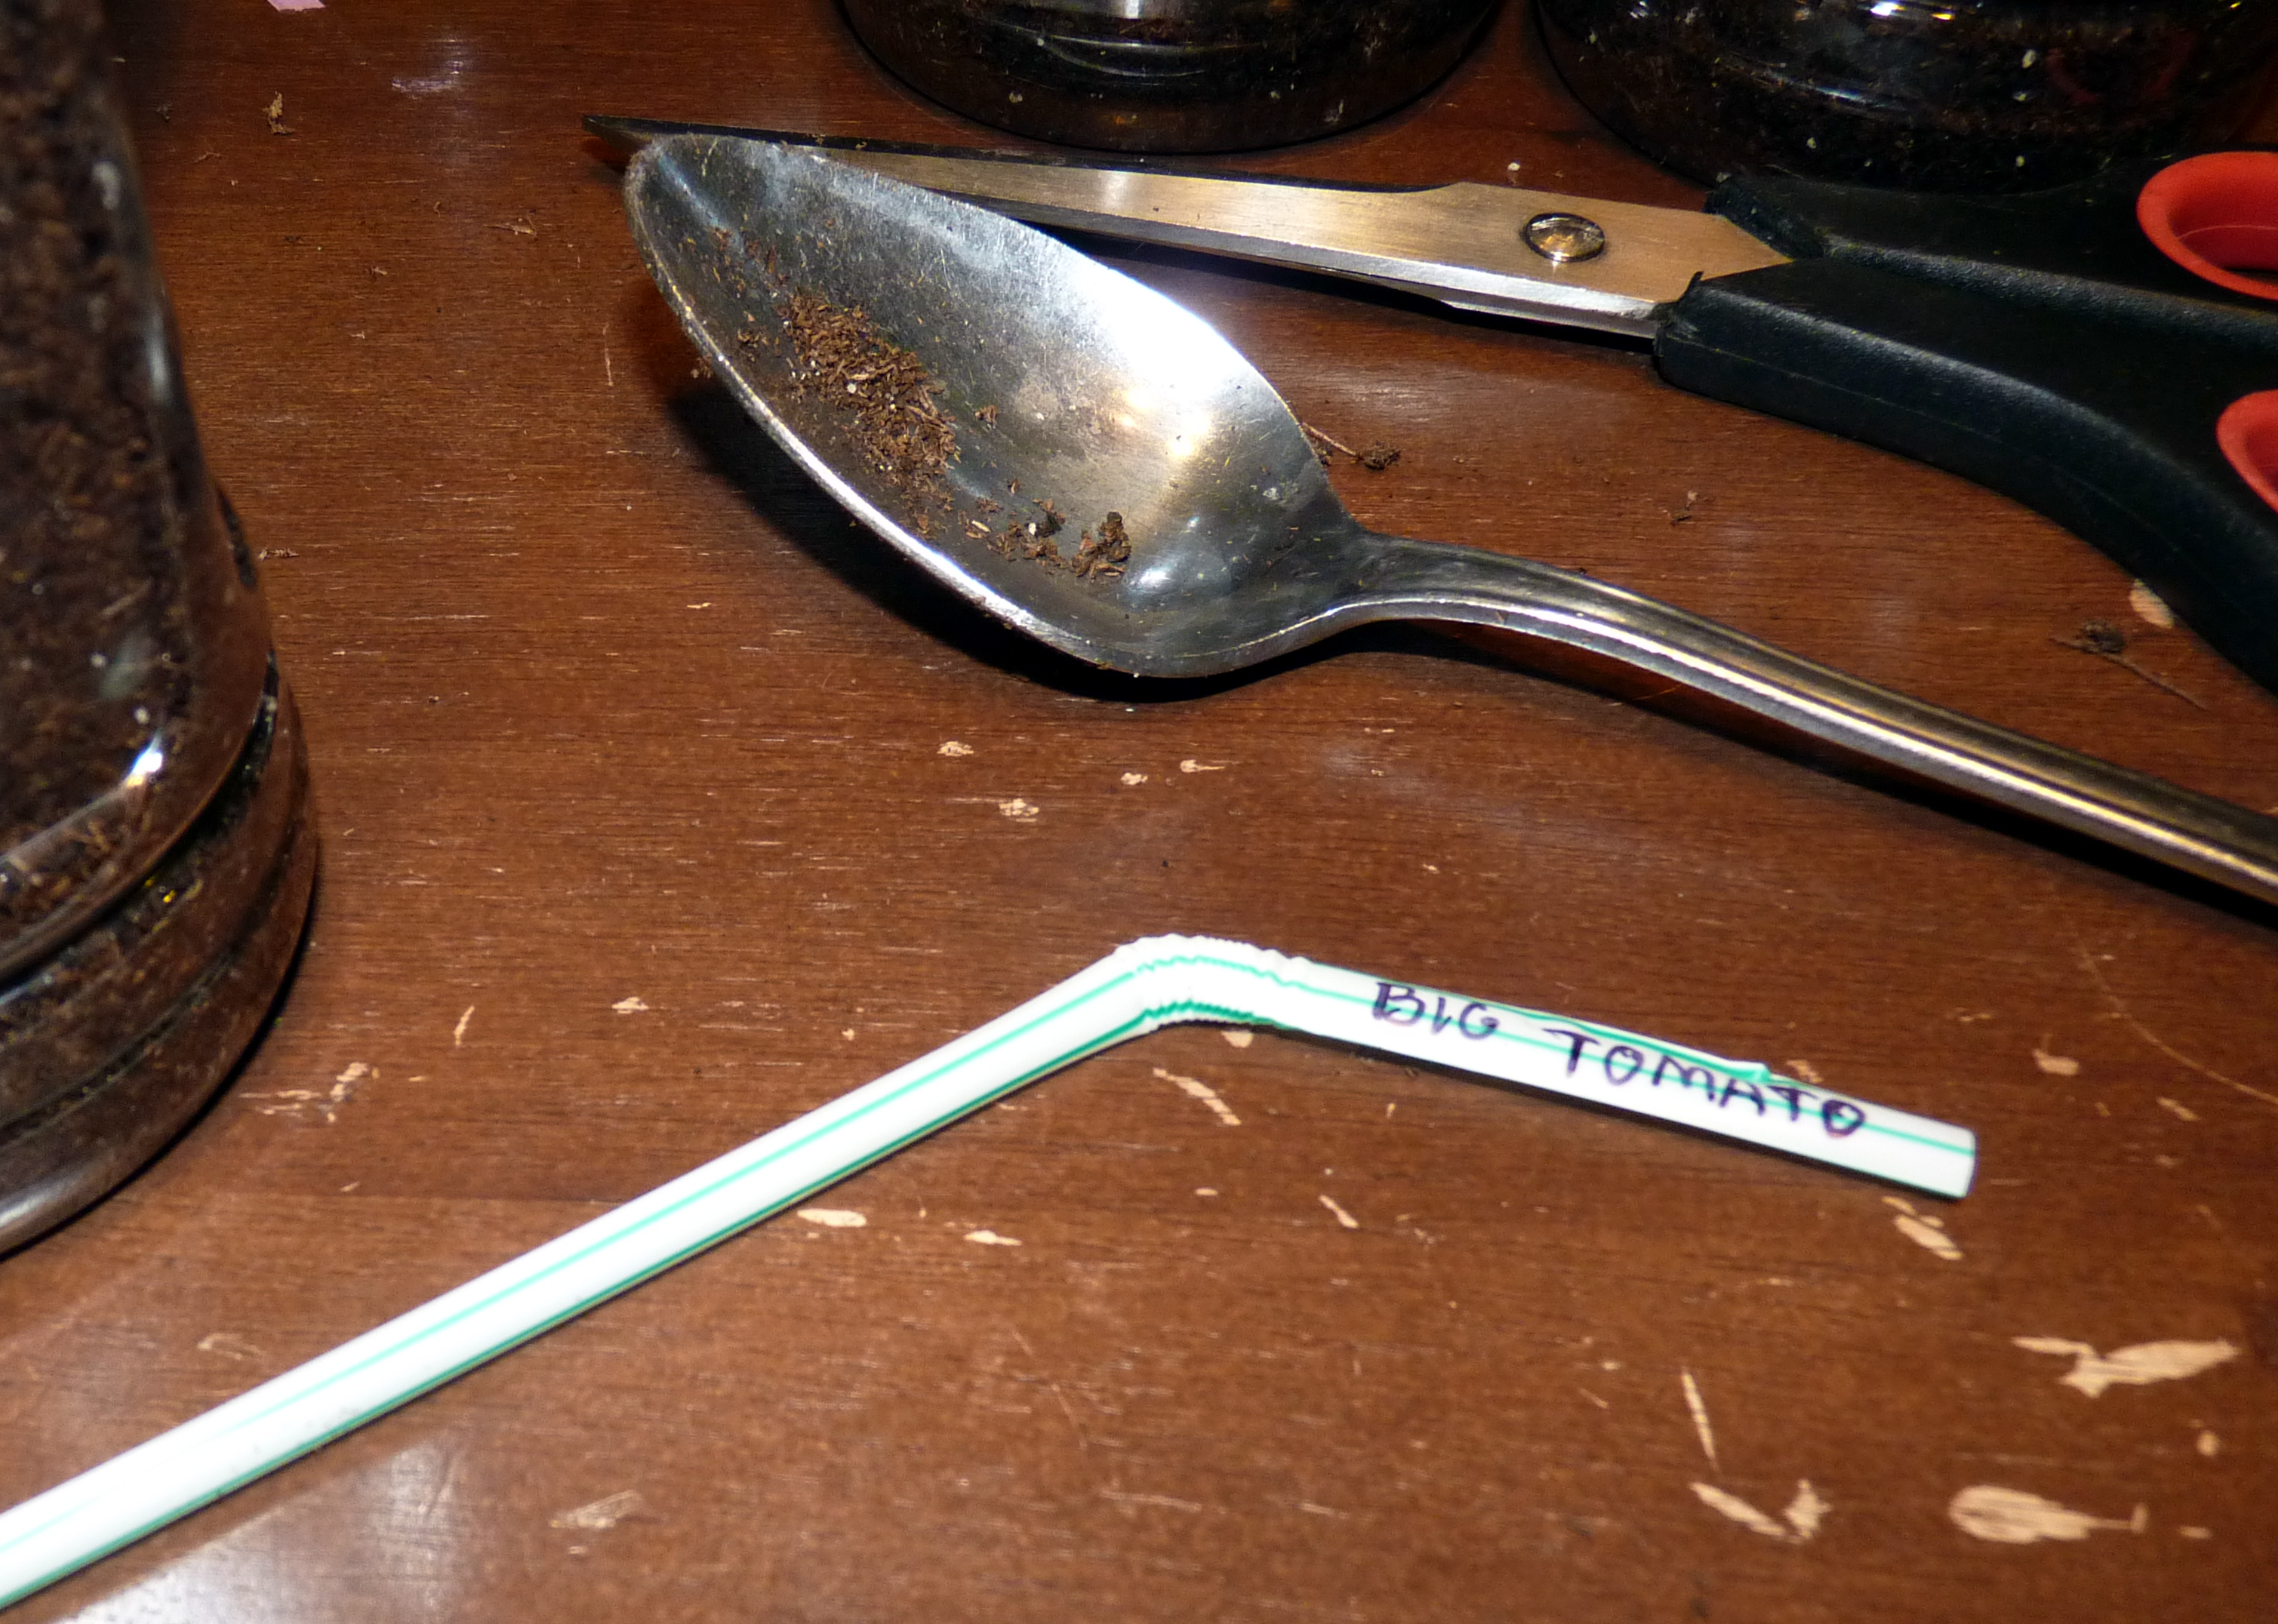 2) Roots are the single most important thing to the success of seedlings. Mine were a little leggy from starting off with not quite enough light, so I buried them deep, leaving all that extra stem below the dirt. Tomato plants will just grow roots along the extra stem and give you a better root system. I used the seed starting soil again from Miracle Grow, since it claims to support and help create healthy roots. I used a tablespoon from the kitchen to lift the seedling’s root ball out of each egg carton cell. You have to be VERY gentle when transplanting seedlings. The stems and leaves are soft and delicate, not like those already hardened-off, ready to plant greenhouse plants you buy at the nursery. They’ll get there, but right now they need a little extra TLC when moving them about. The spoon helped me lift out the entire root system of each seedling with minimal handling of the stems and leaves. Those seedlings that didn’t have great roots established or were smaller, weaker plants I didn’t transplant. There are SO many plants when you start from seed, you can afford to be selective and choose your strongest and best growers. I put only one or two seedlings per bottle, depending on how large they’d grown in the egg cartons.
3) As you transplant each seedling, you want to make sure and label them. I’ve used cut up pieces of the egg carton tops in the past, I forgot to save them this year. >.<
I’ve seen quite a few gardeners use Popsicle or craft sticks, writing on them with a permanent marker. I didn’t have any of those handy; what I did have was a huge bag of bendy straws that had only cost me about $1.48 for the entire bag. I bent the straws, wrote my tags on the bent part and stuck the rest of the straw in the dirt.
Added bonus, the straws acted as little stakes to support the floppy plants until they grew into their new homes.
 Obviously, you can tell pepper plants from tomato plants by their leaves fairly early on. If you’re planting more than one variety of tomato or pepper though, as was my case, you might have a difficult time discerning which is which until they start to flower or fruit. If you’re giving plants away or want them in a very specific place in the garden, you don’t want to have to play a guessing game, so label everything. Unless you like surprises…
4) Once the seedling is planted in the bottle and labeled, you’ll want to give it a good drink. I use an old Tide liquid laundry soap bottle with a few holes poked in the cap. It works better than the huge water pitcher I use for my house plants, giving enough control to water the seedlings thoroughly without drowning them. If you’re concerned you’ll overwater, poke a couple drainage holes in the bottom of your bottles. Make sure to sit them on trays or in troughs if you do that though! I used the black garden trough that was the bottom of my greenhouse and commandeered a plastic crate from the closet; pepper plants went in one, tomatoes in the other. Segregating them keeps them out of trouble. For some reason, my tomato plants try to wrap themselves around other plants if they’re too close. They’re territorial little buggers.
The reason for the big containers is to make it easy on you when it’s time to start the hardening off process. You’ll be moving your seedlings in and out of doors (unless you have a greenhouse or cold frame) and it’s much easier to carry large tubs than move 30 or more individual plants. Even using trays last year, I had some near deaths when plants decided to base-jump off the trays while I was walking.
The tubs are also real life-savers if you need to move your plants FAST. Mid-Missouri is notorious for strong spring storms from March – May. New seedlings break in strong winds, are crushed in torrential rainfall and torn to bits in hail storms. If you live anywhere near the middle of the country, you know storms can come on fast and be unpredictable. Being able to move your plants quickly can save you from starting over.
5) I removed the plastic cover over my ghetto greenhouse when I transplanted to bottles. They have plenty of soil around the roots now to hold water, they didn’t need the extra protection of plastic over them. Keeping the cover on will filter your light too, which can make them leggy. Even with the additional light source, my seedlings always seem to be slightly leggy plants. One thing I have found to help remedy this is to have the window open as much as possible so they get a breeze. I also put a fan on them sometimes, it makes them feel pretty when their hair blows in the breeze. Ok, in truth, I do this to make them stand up and grow a backbone- a slight breeze during the hardening off period, strengthens the plant’s stems. You don’t want wimpy plants that lie there and look pitiful when you move them out to the garden.
Until the hardening off period, I keep the light on them as much as possible and just check the soil with a finger to see if they need water. The clear bottles are handy in that respect as well, you can see if the soil is dry past the surface and how far down. I’ve been adding water about every 4-5 days.
6) Pepper plants like HEAT, so I won’t be moving these little guys into the garden for a few more weeks. I’ve read that pepper plants shouldn’t be transplanted outdoors until the ground temperature has reached around 65 F. This means that it should be staying in at least the 50’s during the night. If transplanted too early in cold soil, it can stunt the pepper plant’s growth, the leaves may turn yellow and the plants look sickly. Tomato plants aren’t as particular, but you shouldn’t put them out until all danger of frost has passed.
This year has been an especially cool spring and most of my landscape plants are off to a slow start. Last year, I had my entire garden in the last couple weeks of April; I’m thinking this year it will be more like the 2nd or 3rd week of May. Even if you do make the mistake of moving your plants out too early and you aren’t great at knitting tiny sweaters, you can heavily mulch and /or cover them during especially cold nights. (Plastic shower curtain liners make great frost covers, need to change yours?)
As long as it doesn’t kill the root, the plant may recover and do well once it gets the heat and sun that it needs.
I’ll write the final bit of this series when I move my transplants outdoors. In the meantime, I’m saving up all my eggshells and coffee grounds. Tomato plants need calcium to avoid blossom drop, a common tomato plant issue (eggshells) and leftover coffee grinds are a great green material for the compost pile.
-B


