 I’m just going to start by saying there is a MEGA PSYCHO-CRAP TON of information out there on growing the perfect tomatoes. I ran into several forums where they were practically ready to kill each other in the debate of which form of calcium is the best soil additive for tomato plants. I’m not a scientist folks; I’m not a farmer, not even a master gardener. I’m a mom that gets tired of worrying about where my food has been, who it was picked and packaged by and whether any of them bothered to wash their hands in the process. I also get sick of paying ridiculous prices for stuff that should have been thrown in a hog trough instead of being put on my daughter’s plate. We’ve had tomatoes from the store that looked ok on the outside, only to slice them and discover moldy seeds inside (I did NOT feed these to my daughter, in case you were wondering) or that they were half green- some looked beautiful, but had absolutely zero flavor.
A friend told me that they saw a tomato fall off a truck on its way to the store and it actually bounced and remained completely intact, going down the highway at 60+ mph. You have to wonder, what in the world have they genetically engineered into those? If you’ve experienced any of the above or similar issues with your produce, you too might be considering growing a few of your own groceries. Tomatoes are one of the first veggies people usually start with.
Tomatoes are fairly easy to grow successfully, even for a novice. They’ll grow in containers, in the ground, even upside down in bags. You can start them from seed or plants. There are tons of different varieties and types so there’s a little something for every taste. To keep this halfway readable and hopefully curb some of my tendency to ramble, I’m going to write this post in individual tips.
Let the sun shine in!
All varieties of tomatoes will benefit from full sun; recommended is 10 hours of light in summer, minimum of 6 hours direct sun per day. Seedlings should be in direct sunlight for 8 hours or get 14-18 hours under grow lights. If your tomato seedlings don’t get enough light, they’ll be leggy. Unfortunately, this doesn’t mean they’ll be top models, but it does mean that the stems will be weak and won’t support the weight at the top of the plant. The closer to the light seedling is, the stronger and bushier it will be.
Plants bought from a store generally are grown under ideal conditions: the stems are strong, the plants have plenty of leaves, root systems well developed and they’re already hardened off and ready to plant. Many first time gardeners may prefer to go with plants, they require less trial and error. Garden centers will tend to choose proven performers that grow well in your local climate and are disease resistant.
Roll over, I’m crowded…
Seedlings and young plants don’t like to be smushed together so that they can’t get air. Too little space between plants will create lazy, slow growing seedlings. As soon as they get a set of leaves, I move mine from egg cartons or a community flat into small individual containers. For tomato and pepper plants, I use 17 oz. plastic water bottles with the tops cut off. I’ve seen pins on Pinterest of people using cardboard toilet paper rolls. If you don’t feel like recycling or reusing a container, most garden centers sell individual pete pots that you can plant directly into the ground when the seedling is ready for transplant. Seedlings will benefit from being placed outside for a few hours on a warm, windy day or set in front of a fan. This helps the stems strengthen up and resist breakage when you kick them out of the house and they’re on their own.
If you plant seedlings in pete pots or cardboard containers- be certain that no portion of the container is above ground and exposed to air. If it is, the container will act like a wick, drying out the root ball and either stunting the plant’s growth or killing it outright.
When choosing seedlings in a nursery or garden center, don’t pick the most crowded, lush leaved plants you can find. These are the plants that will actually get slow starts when transplanted. Pull the plant out of the container slightly and look at the root system. A strong, well developed root system will do more for a new seedling that all that showy top growth.
If you grow your plants from seed, the new seedlings will need to be hardened off before transplanted to the garden. You don’t need to slap them around, just take them outside for a few hours each day. This is easiest to do if you have all your little containers on one big tray or trays- take your seedlings outside each day, gradually increasing their outdoors time. A slightly cloudy day with a bit of wind is the ideal first day; but the main point is, adjust them gradually. If they show signs of shock, like dropping leaves or wilting in too much sun, move them to the shade for a bit. Once they can tolerate some full sun, leave them out overnight, so long as the temperature is over 50-degrees F.
Make a bed they’ll be happy to lie in
All successful plants start with a good foundation. This is where I saw the greatest argument on forums and other sites related to successful tomato planting; they debate to the death whether soil should be tested, what additives to put in, etc., etc.
I suppose you could get all scientific about it- test your soil, adjust PH, start adding chemicals, fertilizers, lime, calcium and so forth. I’ve read detailed recipes of using starter solutions, mixing 8-8-8 fertilizers, phosphorus, lime, peat moss, apply this every two weeks, apply that at the start of the season…
If this is all sounding more like a science experiment than growing food, I’m with you, I thought so too. I had about 5 plants last summer; 3 cherry tomato, two roma- one of the cherries was even left in a pot because I was going to give it to someone and they decided they didn’t want it. I was too lazy to take it out and dig a hole, so I just sat it next to the house. I didn’t use fertilizer. I didn’t do a soil test; add lime, chemicals, or starter solutions. I used potting soil, some kitchen scraps and a compost bin. That’s it. If you have a neighbor with livestock or chickens, you’re golden. Go scoop some poop, mix it with some crushed leaves and work into the soil. Some of the absolute BEST store-bought tomatoes I’ve ever had were from our local Farris Fruit market. They sell these HUGE Mennonite tomatoes every year. I’ll bet you that the big secret behind the flavor and size of these beautiful, awesome tomatoes is probably nothing more complicated than… horse shit.
I start my plants in Miracle grow potting soil. We have clay and rock for earth here naturally, so it has to have something added to it or you get one of two states: muck or concrete, depending on if it’s wet or dry. One of the absolute BEST garden tools I have is my compost bin. I dump yard clippings, chopped leaves, cardboard, kitchen vegetable scraps and livestock poo (when I can get it) in the compost bin. That is the ONLY fertilizer or additive I’ve put on my yard or garden for years. I don’t have to worry about keeping the animals or children off my lawn or washing everything to death before we eat it to avoid the chemicals, because there aren’t any. Use what you have. You can start a compost bin or pile in a relatively small space. You can even throw a little of the stuff directly in the garden and mulch over it, if you have it fenced and don’t have to worry about critters, it will break down naturally.
Tomato and pepper plants LOVE warm soil; a great way to prep your planting space ahead of time is to put down your scraps, leaves, etc., then cover the entire planting area with some cardboard and a layer of black landscaping fabric or plastic. Do it a few weeks before you intend to plant, or better still, do it in the fall and let it sit that way all winter. This also has the added benefit of baking the hell out of the weed and crabgrass seeds so you’re not hoeing or weeding right away.
Tuck them in and give them a blankie
So- your garden plot is ready, your seedlings are ready, now what? Dig a hole and plop them in? Eh- close. Just a couple things first…
Dig your planting holes deep enough to bury seedlings up to the first set of leaves. If you’re buying plants from the store; do the same, even if it means putting them deeper than they originally were in the pot. New roots will develop along the bare stem. I read some silly rhyme about more roots equals more fruits, but silly or not- it’s basically true. The stronger and deeper your root system is, the better the plant will produce. So give them lots of root space and bury them deep. Seedlings that are too wobbly can even be trenched: Dig a trench, pull off all but the uppermost leaves and bury the stem under 2-3 inches of soil. Don’t pack it too tightly around the upper portion to prevent breaking it off and be careful when driving your cages or stakes so you don’t puncture the plant. Don’t worry about them growing sideways, the plant will develop roots all along the stem and straighten up as it moves towards the light.
Even if you aren’t trenching your plants, they may benefit from removal of the bottom leaves once they are about 3 ft. tall. These are the leaves that get splatter from the soil when watered and are usually the first to show fungus issues.
Once your plants are all tucked in and the soil has warmed up (mulch will keep cold soil cold longer) cover them with mulch. Mulch is a young plant’s best friend. It prevents root burn, retains moisture, attracts worms to your soil bed (unfortunately armadillos too and I’ll be writing about this later) and helps hold all those carefully worked-in nutrients in place when you water or it rains. Leaf, straw and wood mulches also break down into the soil over time and add to your compost. Some claim that red mulch reflects red light wavelengths back up onto your tomato plants, which supposedly stimulates their growth. If you can’t find red, it’s ok; regardless of its color, mulch is beneficial to your plants.
If you want your plant to be a lush, give it a drink
Every plant needs some form of moisture to grow, even cacti and succulents. Tomatoes need a fair amount of supplemental water, unless you’re lucky enough to live in an area where it rains like clockwork. Last year, our little part of the world had not only record high temps, but a very long lasting and severe drought. We wound up at the end of the year with a 14 inch or so rain deficit.
I watered our entire garden almost every other day this past summer. The ideal is to water your plants deeply (6-8 inches deep) once a week or 2-3 times a week at the height of summer. Consistency is one of the keys in tomato watering.
I heard SO many complaints about blossom rot on tomato plants last year and one of the most common causes of blossom rot is poor watering practices. The other is calcium deficiency in the soil, which can also be caused by too much watering. Under-watering and then suddenly giving too much water can not only create conditions for blossom rot, it can split fruits as well- causing them to absorb too much water too fast.
Too frequent watering doesn’t allow the sugars to develop in the fruit; so you won’t get maximum flavor potential from your tomato. Consistency, consistency, consistency- if you can’t be bothered, or remember to water regularly and deeply- then you should attach your hose up to a $10 timer. If the plants are stressed from lack of water, especially if you see wilting at the leaves, they may drop their blossoms or their fruit. Caveat to this: I have read that if the plant wilts a bit in the middle of the day that this is normal because tomatoes will close their stomas in the hottest part of the day to prevent water loss by transpiration. If they look like this in the morning though, they need water.
I save my egg shells for a couple months prior to planting tomatoes and add the crushed up shells to my soil when I move my seedlings into the garden. This helps to slowly release calcium into the soil in the event that it is washed out by too much water. Egg shells are also good slug and snail repellent, they don’t like dragging their soft bodies over all those sharp little edges. I didn’t have any issues with blossom rot until the very end of the season last year, when my egg shells finally began to be depleted. (I also got lax in my watering practices, which could also have been the culprit) If you’ve been watering consistently and are pretty sure calcium is the problem, I’ve heard that a little antacid (calcium carbonate) crushed up and side-dressed (added to the soil next to the plant’s roots, not directly to the roots) into the soil can be a great quick fix. Side-dressing prevents burning tender roots, especially when adding fertilizers. For long term calcium control, I swear by my eggshells- and if you’re already eating the eggs in them, re-using the shells costs you nothing.
Help them hold their heads high
I’ve seen lots of methods of staking tomato plants and even some growing methods like the Topsy Turvy that can ignore staking altogether. It’s just the nature of the plant, they grow heavy fruits on thin stems and the plant needs supplemental support to keep from sitting on the ground where the fruit and leaves will rot.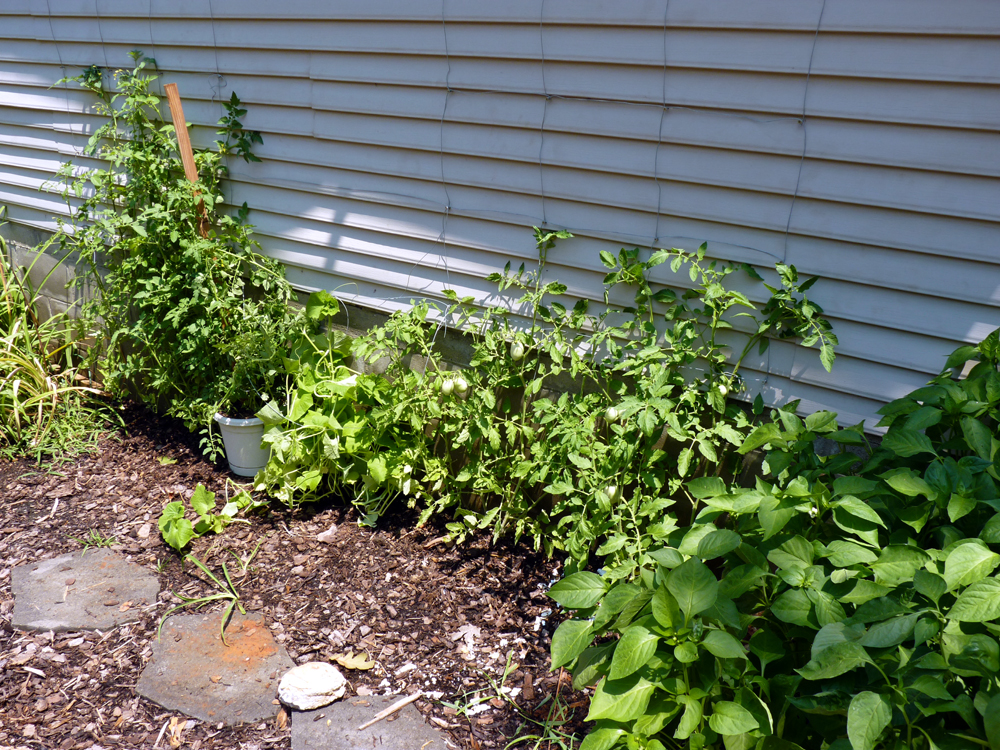
You should stake or cage your plants right after you put them in the ground. Just about anything can be used; wooden stakes, poles, teepees or wire cages. I grew cherry tomato plants on my yard fence last year, letting them vine along the fence just like a morning glory would. Instead of cages and trellis or teepee supports; I’m growing my tomatoes, beans, cucumbers, roses and anything else that climbs right up the side of my house. Our siding is butt-ugly, so I put screws in the house in about a 1 ft. block pattern from ground to roof and strung pliable galvanized wire on the screws. Not all of you are going to want to put permanent trellises directly into your siding, I realize.
There are TONS of options for tomato cages out there, it simply comes down to personal preference and aesthetics, which method of support you decide to use. The only thing you really need to remember is that the cage should be strong and sturdy enough to support the weight of a fully grown tomato plant- you’ll be surprised how heavy these little suckers can get! Recommended is 5.5 – 6 ft in height of concrete reinforcing wire or pasture wire for cages.
For ties, any material that won’t cut in to the plant’s stems is ok- I’ve seen everything from panty hose to pipe cleaners.
Ow quit it! Pinching and Picking
Non-fruiting suckers that develop in a crook between two stems can be removed to encourage development of the rest of the plant, especially toward fruit growth- which is kind of the whole purpose for planting tomato plants in the first place. Let the big leaves alone. (I started to write: “Leave the big leaves alone, but that sounded redundant) Removing too many leaves can let the sun burn your fruit, but a little pruning off the top and removal of suckers is helpful.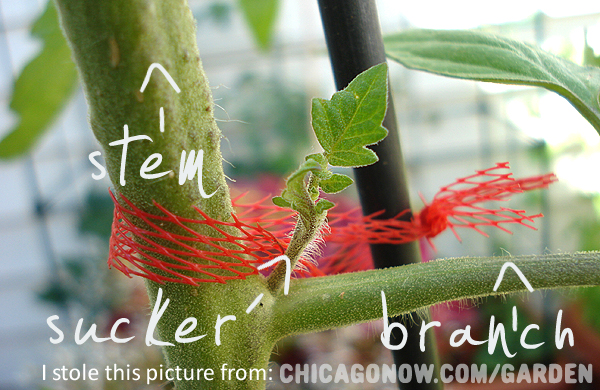
Pick your produce often to encourage the plant to produce more flowers and fruit. Taste is also a factor, some cultivars can develop an odd texture if left on the vine too long.
Store your picked fruit in a cool, dry place- not the refrigerator, it will cause them to loose flavor and I’ve found some garden tomatoes just turn to instant mush in the fridge. Try different varieties to see what suits your palette best. Last year we grew romas and cherry tomatoes. This year, I’m trying an heirloom beefsteak variety and a grape. In the fall, right before first freeze, you can harvest even your green tomatoes and store them for later. They won’t have the flavor of vine-ripened, but mine were still better than store bought. I put the greens in a brown paper bag and removed the ripe ones every few days until we’d eaten them all.
If you store your stakes, cages or ties inside- they might benefit from a bleach water wash before using them again the next season.
I didn’t delve into a lot of the tomato pests and diseases here, since this is primarily meant to be a guide to grow them under the best conditions to prevent many of those issues in the first place. However, Wiki has a very comprehensive list of tomato plant diseases and problems here: http://en.wikipedia.org/wiki/List_of_tomato_diseases if you’d like a good guide.
Hope all this was helpful! I’d love to see comments about methods, your tips & tricks or growing success.
-B

