Those of you that aren’t yet convinced that Bradford Pears are evil, spreading little thorn covered demons, I want you to take a good look at the photo above.
That stump is what remains of the biggest Bradford Pear tree I think I’ve ever seen. Now I can’t blame Pa Paw for planting this beast, because when he planted it, people were told that Bradford’s were sterile and were the perfect ornamental tree for any home landscape. It wasn’t until 20-30 years later that they realized that this was, in fact, complete and utter BS.
Bradford pears do, in fact, bear fruit. They are not sterile as once believed. This means the birds eat them and spread them EVERYWHERE. Worse yet, the trees that sprout from that fruit are not true to their original form, but true to the root stock that the Bradford’s are grown on, which is the Chinese Callery Pear. Here the Midwest, the Callery Pear is considered an invasive plant. The photo above is what happens when you try to cut down a Bradford and can’t or don’t burn out every last bit of the stump and root system along with it. Unless I want to destroy a huge patch of Paw Pa’s Surprise Lilies and Day Lilies, I will be cutting down little Callery Pears that sprout off of this root system from hell for YEARS.
Did I mention the new trees have thorns? Thorns that are as big and sharp as those on Honey Locust (which we also have here). These lovely trees have been known to grow in thickets so dense and so covered in thorns that they will shred tractor tires or bulldozer treads of the machinery trying to clear them from unattended land.
So once again this year, I’ll be hunting them. If I see them in the woods or our fields, they are immediately cut down. I’ll cut all these sprouts off (AGAIN) this year, I’m hoping that eventually the root system will die out and they’ll stop coming up. I may be fooling myself with wishful thinking…
My other option is to dig up all the those lilies, find them a new spot and burn the ground deep enough to destroy the Bradford’s Spawn, then let it recover. I have considered this option.
Seriously folks, don’t plant these freaking trees. They look pretty and innocuous sitting at the nursery or garden center, but they are in fact, the Children of Hell. If you’d like a pretty white tree to plant that blooms in early spring may I recommend a Service Berry or Wild Plum. These both grow nicely in the Midwest and are actual natives, so they add wildlife value to your landscape. Or grow actual pear trees, like Bartlett or Kiefer Pears, then you get fruit AND pretty flowers. Our domestic plums bloomed last week also and were beautiful. Or if you’d like a little color- Ornamental cherries are nice, Peach trees have gorgeous pinky-peach blossoms. Redbuds are amazing for color (and you can make lemonade from the flowers)!
I keep seeing people in my gardening and landscaping forums asking, what is this purple flowered weed that’s taking over my yard and how do I get rid of it?
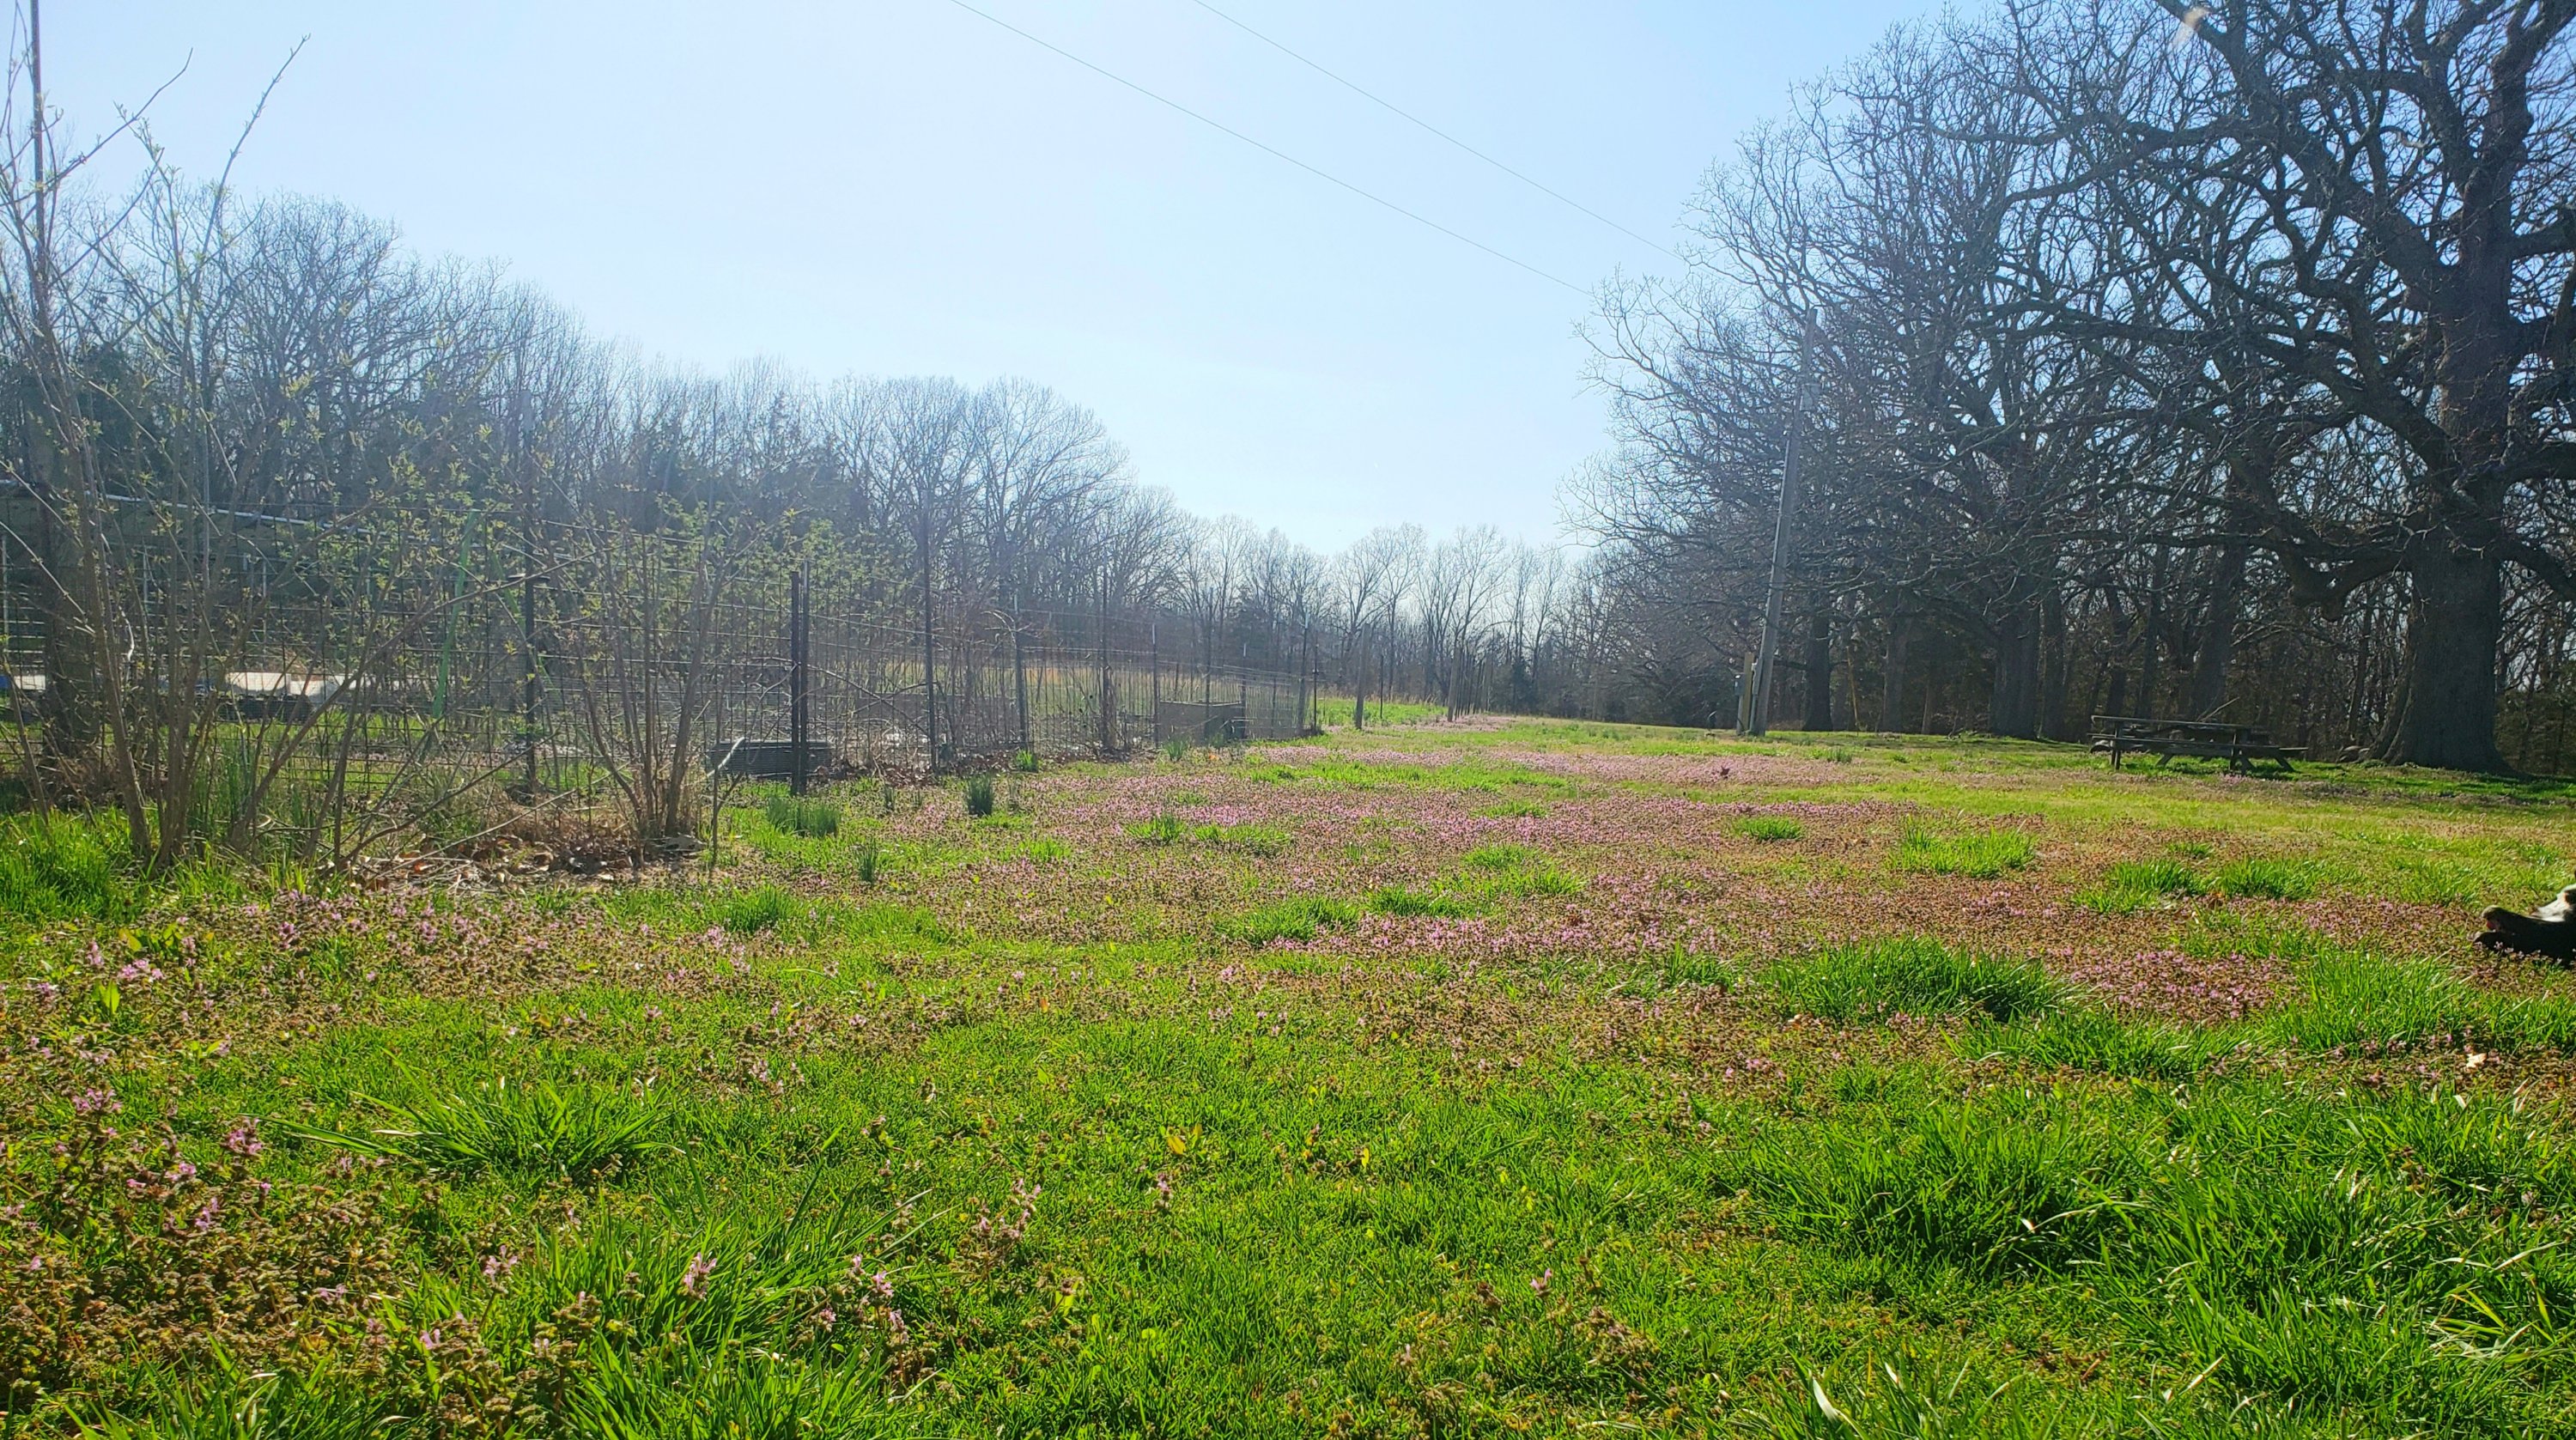
It’s early April and the grass in our yard is just beginning to grow. There is an abundance of wild onion, clover and chickweed already sprouting as well as a carpet of purple from henbit, several species of violet and dead nettle. This week I’m starting to see the occasional spot of yellow from dandelions.
If your yard is full of henbit or dead nettle, be patient. This is what my yard looks like right now:
I’ve seen several articles online claiming that henbit will choke out grass, but I’ve yet to see it happen. All of that purple- that’s henbit, with a little dead nettle and a lot of tiny violets thrown in for good measure. The bees freaking love it, in fact all the emerging pollinators love it and that’s good news for both my currently blooming orchard and my soon to be blooming garden. I want to draw as many native pollinators to our property as possible. If you’re a save the bees kind of person, you’ll want to leave the flowers too. But here’s the good news- dead nettle and henbit aren’t going to destroy your grass. They will carpet the yard for about a month, then go to seed and die back to the ground until next year. The emerging grass will then take over, thicken up and make you spend hours mowing it all summer. Be PATIENT. Your grass is coming, just not yet.
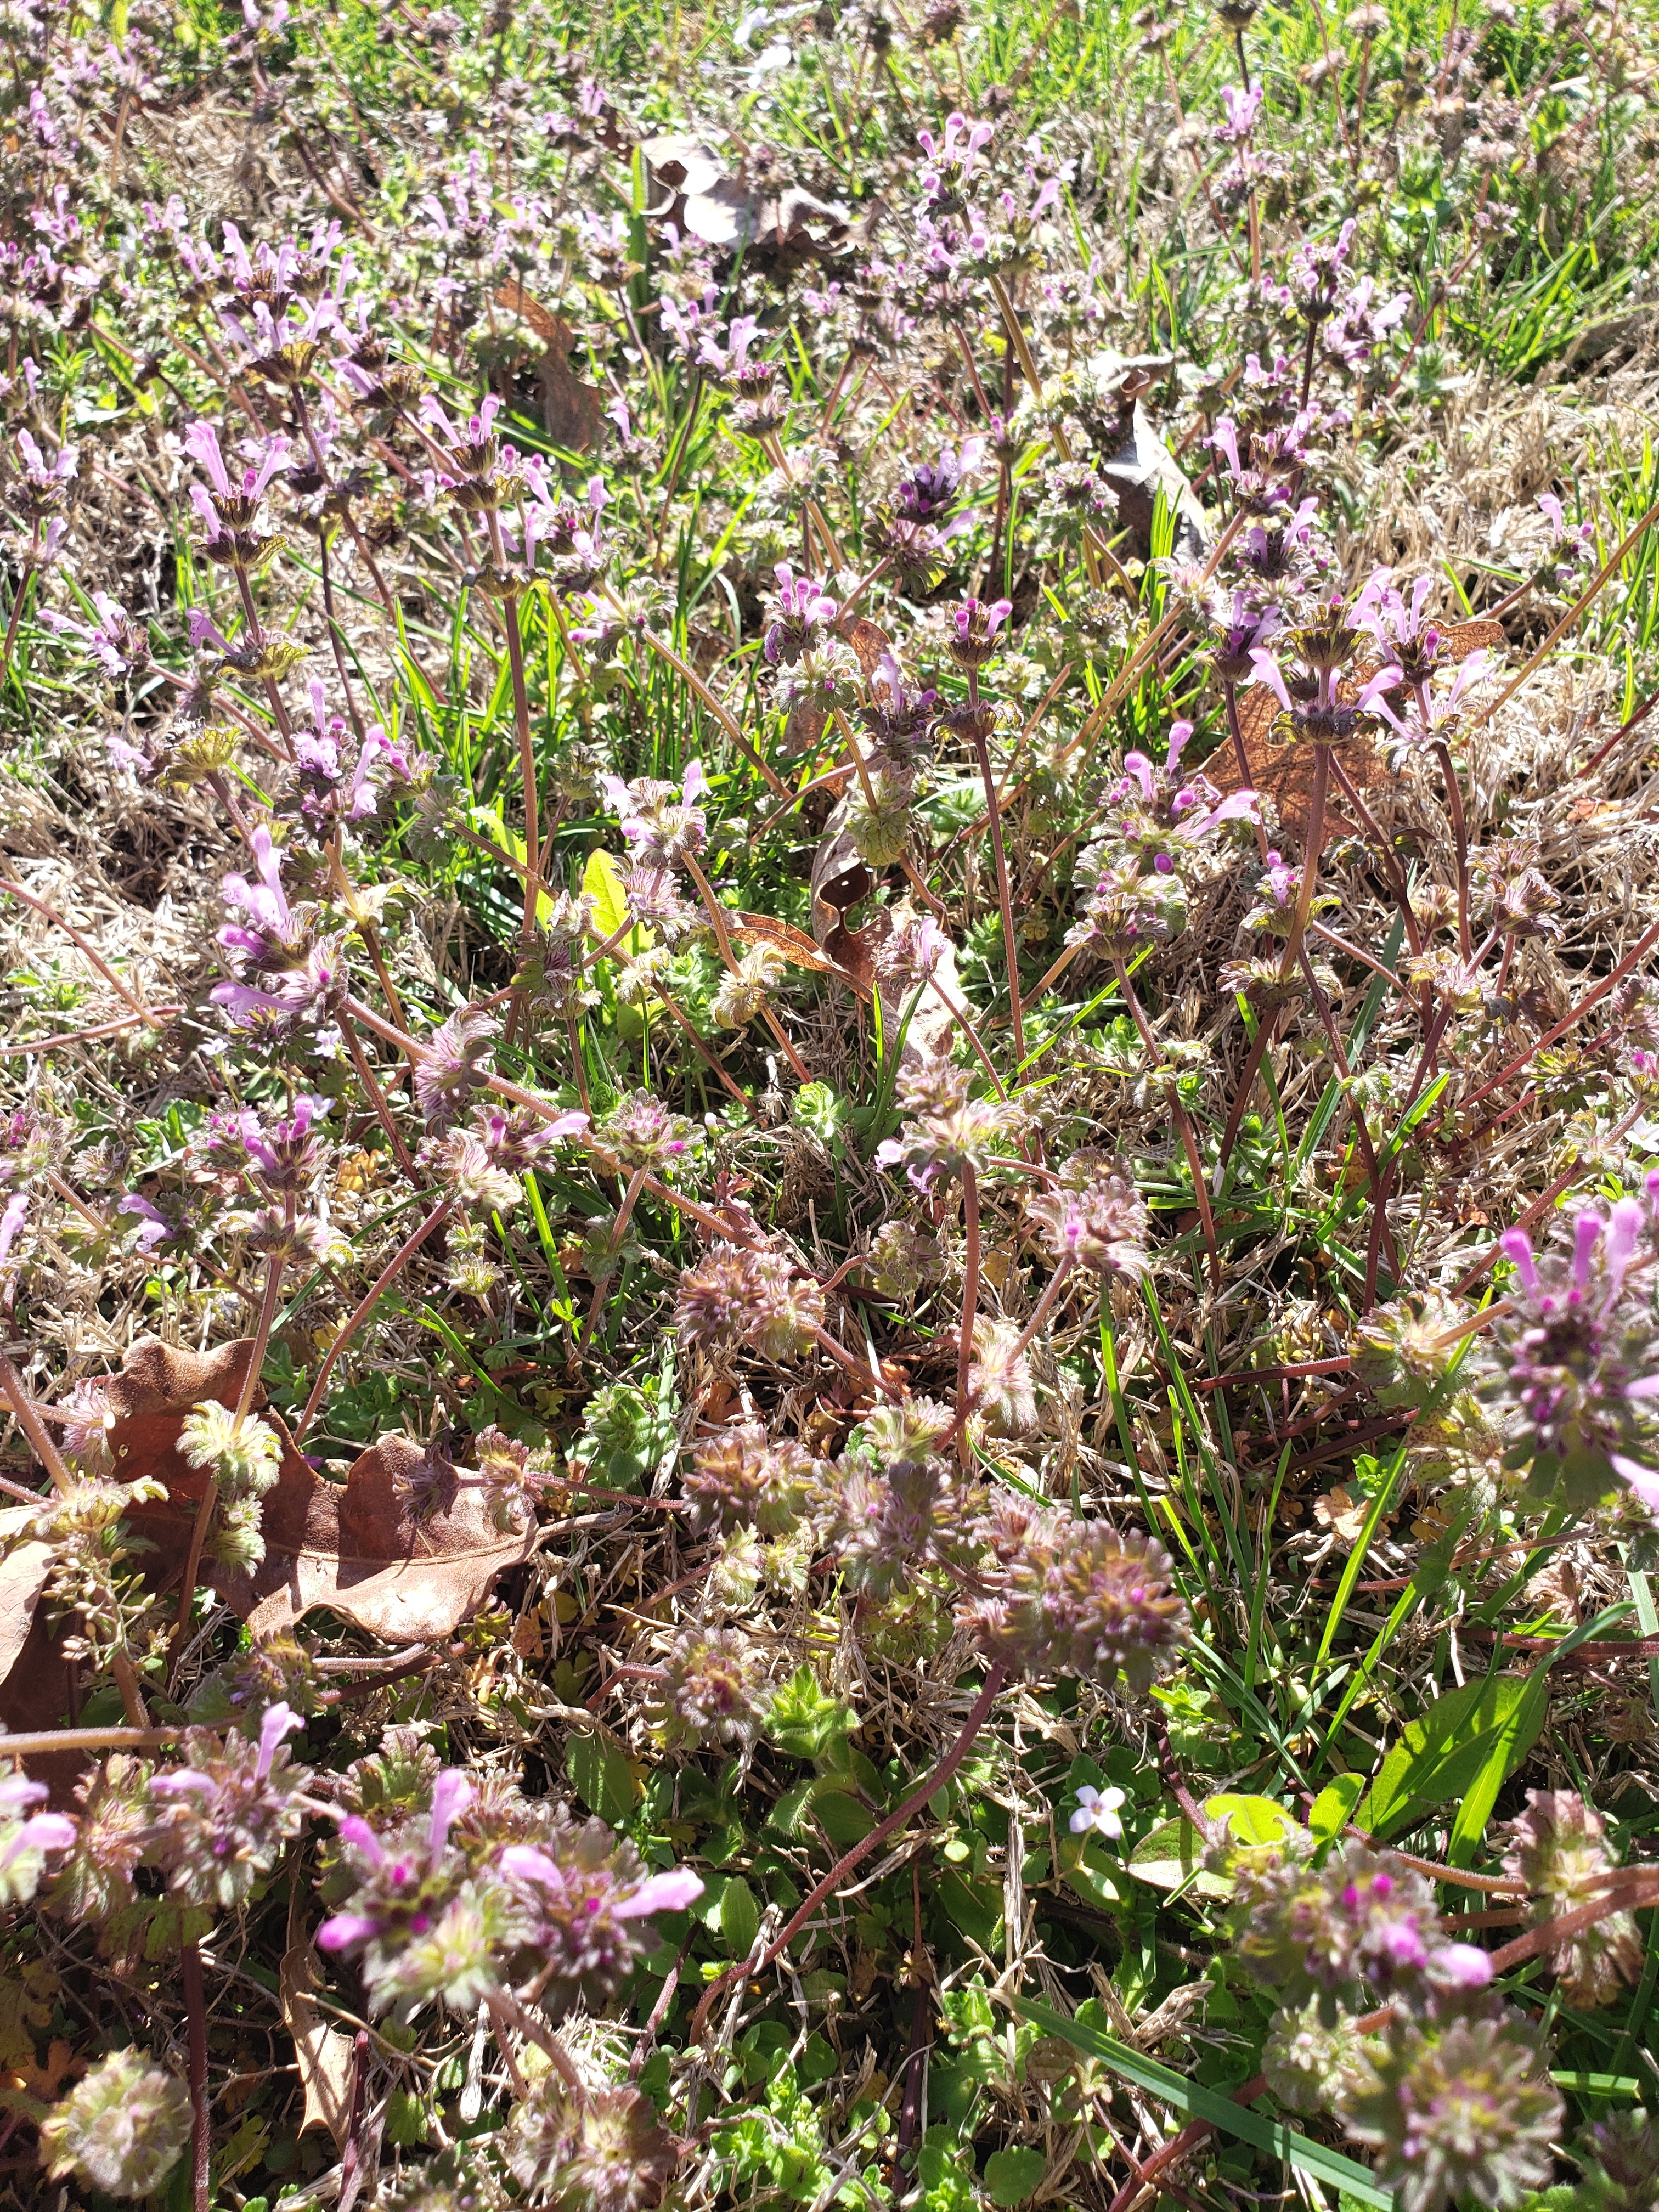
This is henbit close up. My daughter likes to pick the little flowers off and eat them because they are sweet. Henbit can be eaten fresh or cooked as an herb, used in teas, salads, wraps and smoothies. All parts of the plant above ground are edible and high in iron, vitamins and fiber.
This is dead nettle or purple nettle. If you have this ‘weed’ in your yard, rejoice. It is a medicinal herb and can be used as an astringent and diuretic. Applied topically, it’s anti-inflammatory, anti-fungal and anti-bacterial. The leaves and be applied to wounds as a poultice. You can also use the leaves fresh or dried in tea. I use dead nettle to make dead nettle salve, which my family uses to treat everything from bug bites and boils to rashes of all kinds. I even use it as lip balm in winter.
Both of these plants are part of the mint family, which means they may look as if they are just taking over a yard. Don’t freak. By May they will be almost completely gone and your grass will take over until next year. You’ll never even know they were there. You could try and rip them out or catch all the seeds to stop them from coming back. You could use one of those nasty herbicides and then re-seed your yard with grass. Or you could leave them alone. Let the bees have their food, maybe try a bit yourself and have an excuse not to mow for a few more weeks. 🙂
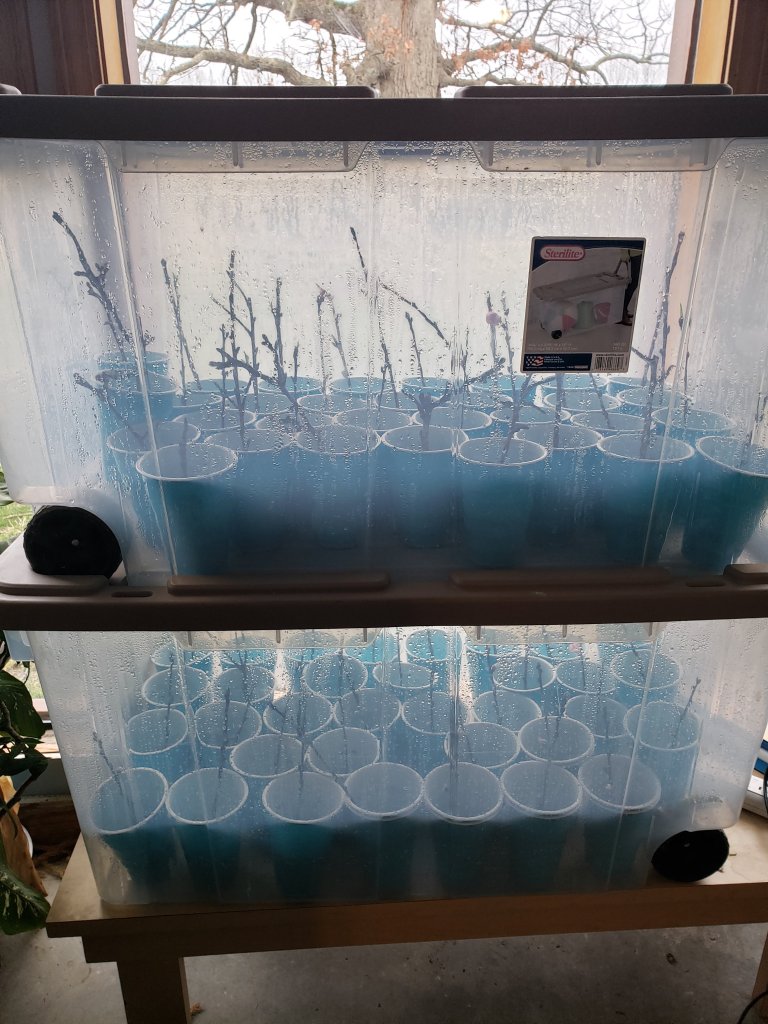
So remember when I said we’d see how this goes and I’d either get trees or dead, moldy sticks?
I got dead moldy sticks.
Let me explain why.
I put lids on these, added heat mats below and watered the cups from above. All of these things combined created the perfect medium for mold growth, which in turn kept my cuttings from rooting properly. I like posting my complete failures on this page alongside the successes, so that you might learn from my moldy sticks and not have moldy sticks of your own. Plants need four things to thrive: Sunlight. I had a grow light on them and they are right by a Southern window, so that was all good. Water. I watered AND misted them regularly, because this is what I saw on the YouTube video about starting cuttings and was following their example. Soil. They were planted in peat pellets inside sterile potting mix. Air. Plants need to breathe. Their roots need to breathe. I seriously neglected that last one. Long story short, my cuttings suffocated. Then they molded because they were dead. So sticks and all went in the compost pile (not the plastic cups) and I started over.
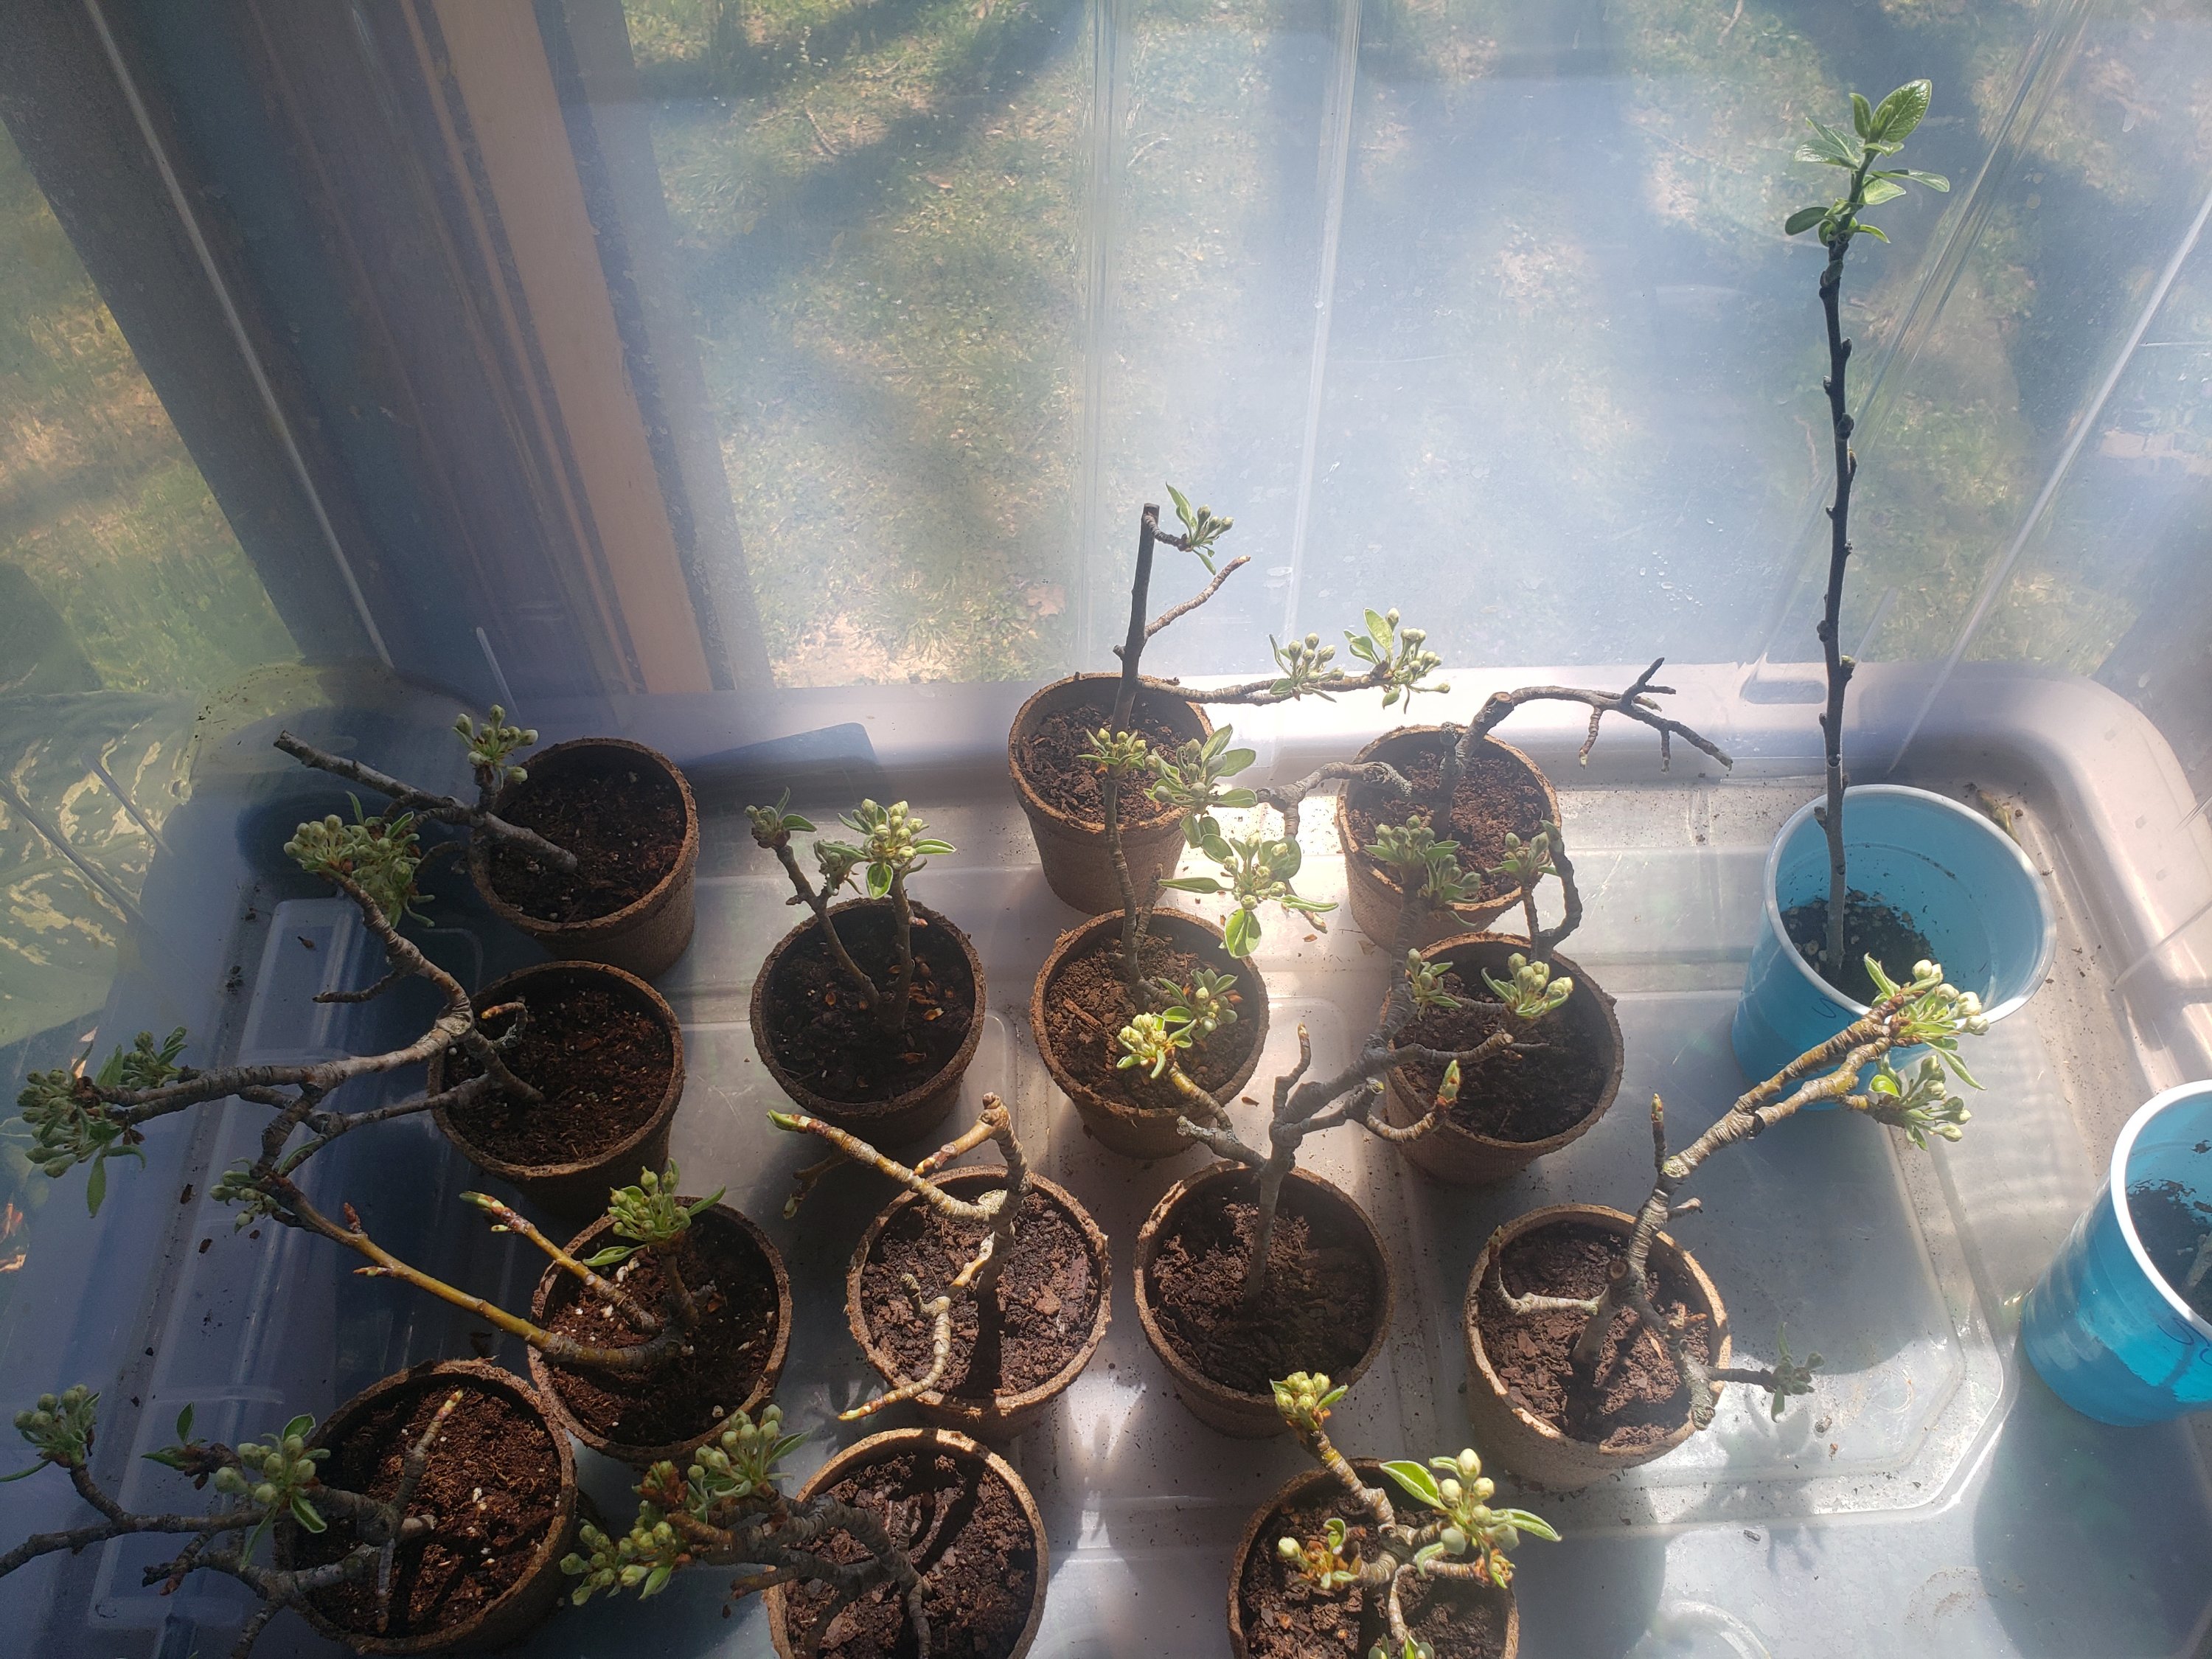
I only had 4 survivors from this experiment. As of yesterday, I’m down to three. 😦
So, I’m doing what gardeners do. I’m learning from my mistakes and trying again. I replaced the plastic cups with peat pots. I don’t water from the top down with these, I just pour water in the bottom of the crate and let the pots soak it up. I still put the lid on at night, but during the day, it’s left off so they get maximum air flow. Some folks I’ve read put a small fan on their seedlings for air flow.
These are pear cuttings from Tom’s grandpa’s trees that he planted over 30 years ago. There are only three pears left of the orchard he planted back then and two plum trees, one of which had a very bad case of gummosis and is attempting to recover after having over 98% of the tree removed. The pears have fire blight. I’m treating them, but I’ve already lost one to the disease and I wanted to get starts of Pa Paw’s trees before I lost the rest.
This batch is looking much healthier, so I’m hopeful. I’ll keep you posted as to their success or failure- if this round doesn’t work, I’ll get some stronger rooting hormone and try one more time before summer hits.
So I’ve been writing a lot lately, working on my novel that I’ve picked at on and off for a couple years.
I finally decided it was time to get serious and finish the damn thing, but this means my head is in book and I have literally nothing dirt or art related to show you. Unless you count the research I did today on karst topography. I guess that’s sort of dirt/landscapy? But I’m not ready to talk about the book yet. Closer to publishing time, perhaps.
So here’s a picture of my kid. Taking stitches out of a goat.
You’re welcome.
It will surely warm up soon and I’ll have more to say on a garden and yard related front. Until then…
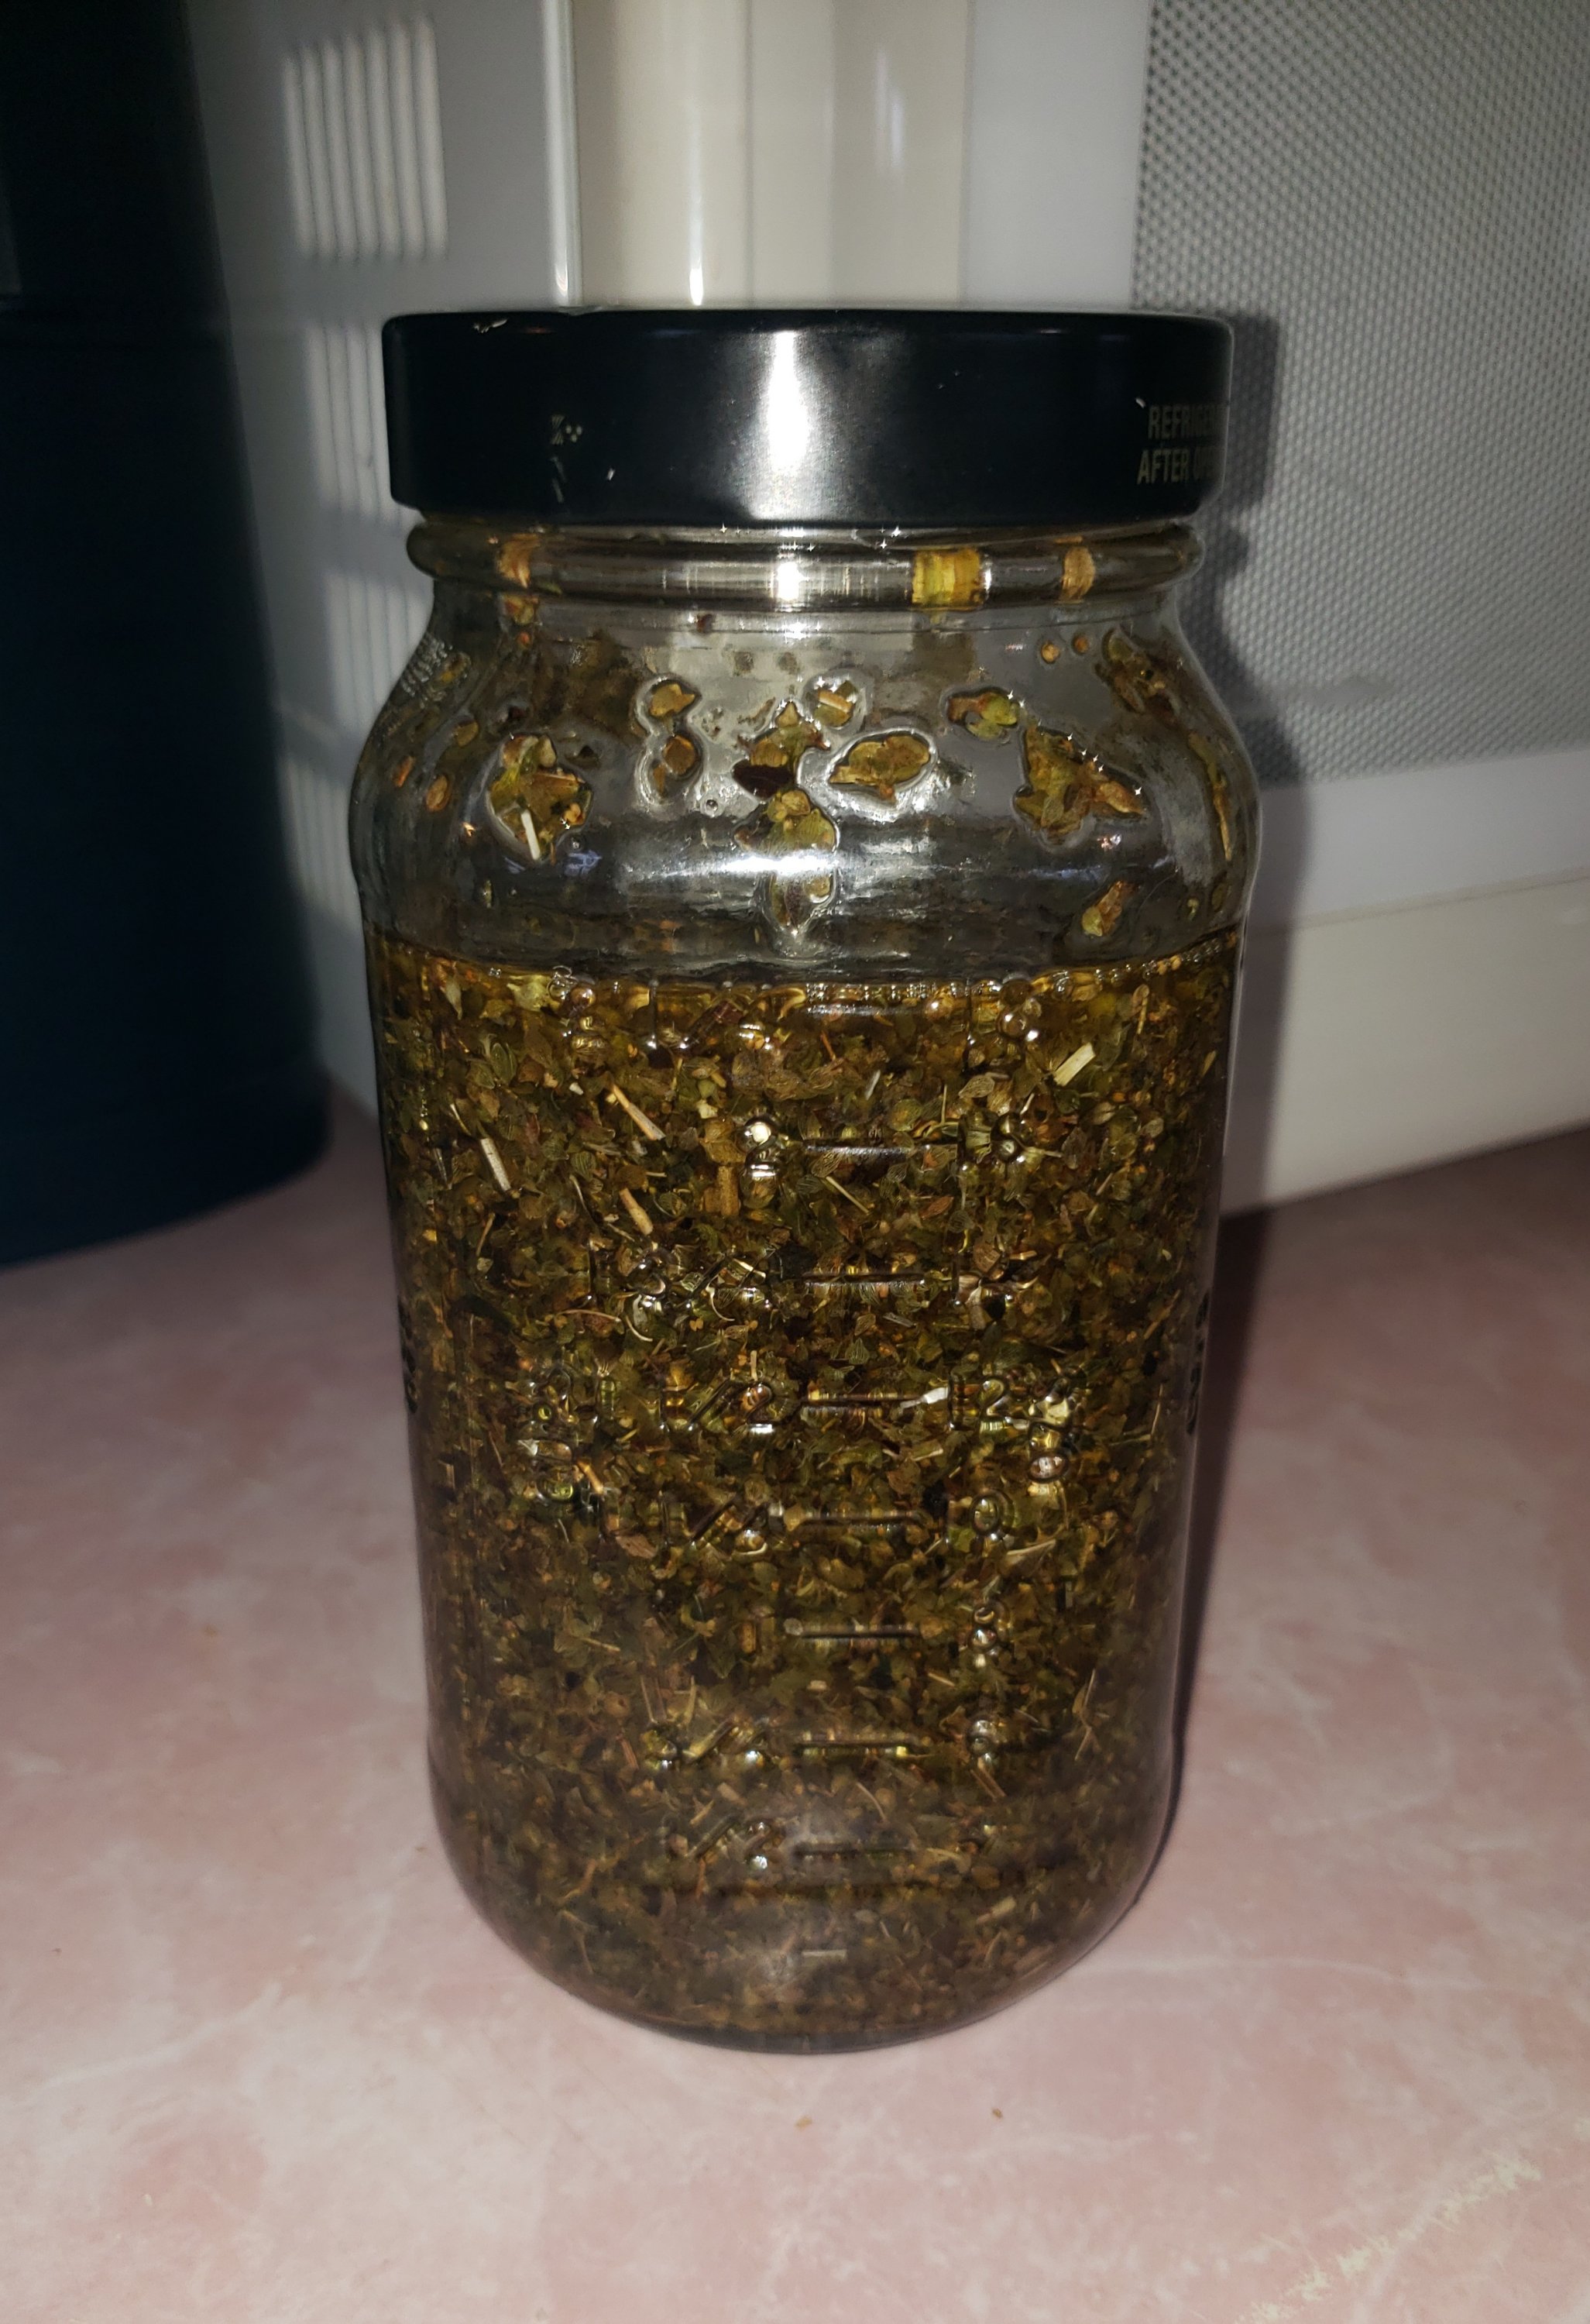
I’ve started infusing some almond oil with oregano. This jar just sits on my kitchen counter for several weeks, I occasionally walk by and shake it up, then let it sit again. Not sure what I’m going to make with it when it’s finished. I just wanted an oregano infusion to play with.
I’ve been taking oregano supplements on and off for years. Like any herbal, I have to throw a word of caution out there- you CAN overdose on oregano, just as you could a medication from your pharmacist. Plant medicine IS medicine, so if you’re going to treat conditions at home with herbals, know what you’re taking, how much and recommended safe doses. More is not necessarily better. Herbals are not miracles either, some of them take time to build up a level in your system to work optimally. What I love about my herbal medicines is that many of them lack the nasty side effects that I often get with prescription meds. If there is a side effect listed on a drug, it seems I will have it. I’m one of those people that will go into a 16 hour coma from taking two Percocet and thanks to having Hashimoto’s, I metabolize drugs VERY slowly, so they often hang in my system much longer than I’d like. That being said, I still work with my doctor to find appropriate treatments and if a prescription is called for, I get a prescription. Modern medicine is around for a reason and it’s not just entirely for profit (although I’ll agree there is plenty of profiting from people’s medical misery). If I need an antibiotic, I get the antibiotic. But I might also supplement that antibiotic with extra zinc, maybe some bone broth and some mullein if my lungs are suffering. A woman in 2013 let her son die because he had strep (which is VERY treatable by modern medicine) and she refused to take him to the doctor- instead opting to keep him in bed for 10 days while she gave him only dandelion tea and oregano oil.
So if you’re going to use herbal remedies, a little common sense goes a long way. You need to know when your condition might benefit from herbals as an adjunct to medication or if it’s treatable by natural methods alone. Do some research, get your herbal remedies from reputable sources, don’t expect them to be a magic bullet and remember that herbal medicine is medicine and comes with it’s dangers and limitations.
I am not making an ingestible oil, otherwise I would have used a different base than sweet almond. I will likely be using this is some type of salve preparation. Oral use, they recommend only 2-3 drops a day which works out to about 50-80 milligrams a dose.
Although- your skin is very good at absorbing chemicals, herbals, medications, etc. that you put on it (this is why I’m careful about what I spray on or put on my skin!) I was having issues with my Vitamin D in winter, even while taking an oral supplement. I started using a skin cream about 6 months ago that had Vitamin D in it- my last lab came back in the normal range for the first time in years. I spend enough time outside in the sun in summer, it’s not usually an issue.
By the way, Vitamin D is fat soluble (as are A, E and K), which means that your body stores it in fat cells instead of the excess being excreted through your kidneys. It’s one of those supplements you need to be careful with, since it can build up to toxic levels in your body. I get a blood test every 6 months to monitor my level. Oregano oil should not be used by people that are on prescription blood thinners like Coumadin, as it can lower your clotting ability over time. You shouldn’t take it several weeks before having surgery either, for the same reason.
Ok, so all the scary warnings are out of the way. Is it weird that I lead with that? I feel like people on social media are a bit too casual with their use of herbal medicine. I wonder if part of that comes from some medical professional’s denial that there is any benefit at all to taking supplements like oregano or certain vitamins/minerals. I’ve had several doctors that absolutely bristled at the mention of my taking herbals and/or supplements. My current doctor is thankfully on board and even recommends them when appropriate. I once had a nurse look at my list of herbals and say, “And what is it you THINK these do?”
All I can tell the naysayers is that plant medicine was around long before you could go to your local pharmacy and pick up a bottle of aspirin. In fact, that bottle of aspirin… which is salicylic acid… is also present in willow bark.
My first use of oral oregano oil was to treat a recurring stomach ulcer. I’d been on prescription medications that helped for a while and then had nasty side effects. I ate Tums like candy, I tried over the counter meds like Zantac and Pepcid. They’d help to abate the symptoms for a bit, but it would always come back. I did some research and found out that often stomach ulcers are caused by the bacteria H Pylori, which can damage the lining of the small intestine and stomach, resulting in an ulcer. Oregano oil will kill H Pylori bacteria. In fact, it was found in recent studies to be potent enough to destroy MRSA (Methicillin resistant staphylococcus) when used topically on wounds. I took Oregano Oil, Slippery Elm Bark and Marshmallow (the herb, not the things you make Smores with) for about 2 weeks. No more ulcer. No more gut pain, no more swollen, gassy stomach. It went away and has stayed away for months. If I start to feel like I’m having a lot of indigestion, I use those herbs again for about a week and it goes away.
Oregano is pretty easy to grow (it’s in the mint family) and to work into your diet, especially if you’re a fan of Spanish, Greek or Italian food. Some of the science backed health benefits include: rich in antioxidants which fight free radicals in your body (those nasty little things that cause things like aging skin and cancer), they are doing studies now regarding it’s potential benefit in fighting certain existing cancers.
It is antiviral, antibacterial and kills fungus. It is an anti-inflammatory. It may help to protect kidneys from calcium oxalate crystal formation. It is rich in magnesium (many people are magnesium deficient). It may help to lower LDL cholesterol, calm irritable bowel syndrome and digestive discomfort because of it’s high levels of carvacrol. It is also being studied for it’s use in heart health to lower blood pressure and keep calcium from forming plaques in the arteries and as a blood sugar regulator.
As a skin treatment it can kill all kinds of yeast, it is highly effective at repelling mosquitos and can kill bacteria as well or better than Neosporin. It’s anti-inflammatory properties might make it useful for localized surface swelling from arthritis (like in hands or feet, knees). It may be especially useful for those with cystic type acne, eczema, psoriasis, ringworm, rosacea and varicose veins. My interest in the topical oil is for rosacea and localized swelling between the knuckle joints on my hands. I’ll likely test it out for a bit first before making it available on the Etsy shop so I can give my personal experience with it.
I went to fill stockings on Christmas Eve, which now hang on hooks in front of the ‘stein cabinet’ because we no longer have a fireplace. As I was pulling the stockings off, I started noticing the photographs in the cabinet: my Grandpa Keith, who used to call every Christmas from Oklahoma City, when long distance calls were still something really special. Tom’s dad, Wayne who never got to meet Ely, but would have adored her. Tom’s grandparents, my Great Grandma…
I used to have a huge family. I have Christmas photos where there are 4-5 generations in a single picture. My Grandma’s house at Christmas was packed with grandparents, aunts, uncles, cousins, significant others, friends. We’d barely fit in the house without tripping over each other. My grandma would cook for days.
This year, I got a card from one brother, the other sent my daughter a card and some cash. I got a text from my sister. That’s it. My world of family and friends has gone from a stuffed-house-full to the three of us and the dogs.
Which I’m ok with. ReallyI am. I love that it’s quiet, that I can sit around all day in sweats and slippers, that I can be with my favorite two people in the world without drama or distraction and enjoy my holiday.
Still, there’s that photo. My grandpa smiling at me from inside the stein cabinet… I can hear his voice on the phone, feel his legendary laugh. It breaks something inside when I think about how we looked forward to those Christmas phone calls, that it’s been almost 30 years since I’ve had one… that I’ll never have one again.
Usually I can smile, appreciate the bittersweet memory and move on. This year, I couldn’t get past it. Maybe it’s because we’ve all been sick for a week and my resilience was down I saw that picture and just spiraled. I missed him horribly. I couldn’t deal with the old movies this year, they were a stark reminder of watching them with Mom.
My cousins, I haven’t seen since we were kids. Only one I have on Facebook, the rest I have no idea where they are or who they are anymore. Of my aunts and uncles, the last time I saw them in person was at a funeral.
I didn’t even send out Christmas cards. It was just depressing how few people I had to send them to. I wondered how many of those actually noticed or cared. I tried telling myself that we have SO much and I should be over the moon happy instead of mourning what’s missing.
But everything was just hard this year. It didn’t matter what pep talks or admonition I gave myself, it didn’t change that or snap me out of it.
So today I decided enough was enough. It was time to kick some dirt over that shit and move on. I packed up the holiday and put it away.
You know what? I feel better.
The house is cleaner, it’s less cluttered and so is my heart.
I remembered whole cleaning that several years ago, I made a vow to myself to stop chasing after people. If I was not a priority in their life, I didn’t go running after old memories or relationships that were one-sided. I let them go and focused on the people that I was important to.
I realized this Christmas that I’d basically been doing the opposite of that. I was chasing after ghosts, mourning what was lost instead of celebrating all the amazing things I have. I’m thinking I’ll have a better New Year’s. Next Christmas I’ll go read this post if I start to spiral and remind myself that it’s ok to miss those that are gone… but it’s not ok to go lie down and die along with them.
I hope you all had a wonderful Christmas, or at least survived as well and that you have a hopeful (and healthy!) New year.
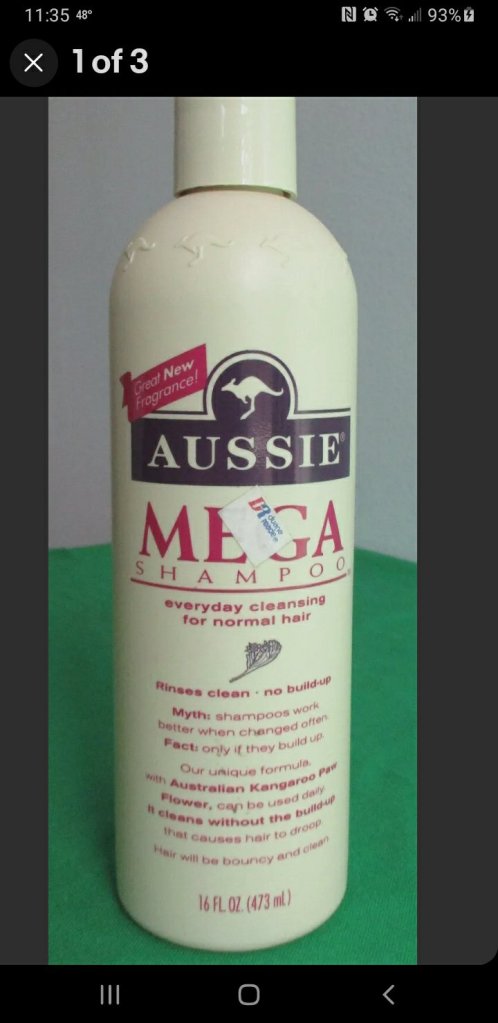
So I recently ran out of shampoo and had to grab what was available in the grocery store beauty isle- where I found this.
Now I haven’t used this stuff since the 90s, but I remember it well, it was new in the late 80s, early 90’s, was very popular and looked like this then. Also it did not have that hideous M-word on the bottle ( no, I’m not referring to ‘Miracle’ or ‘Mega’)
My then roommate argued that it smelled like grape. I said no, it smells like strawberry. So 30+ years have now passed and I finally found out what this really smells like! (Thank you Google). I was at least 1/3 right; it does have strawberry scent in it. But it’s also pomegranate and musk.
So that’s why we could both tell it smelled fruity, but not exactly what sort of fruit. (BTW, roommate was 100% wrong. There is no grape.)
All this scent memory lane also got me thinking about these:
If you were a teenager in the late 80’s/90’s, chances are you smelled like one of the above. If you were a preppy guy who went to Camdenton in the classes of 89-92, you freaking bathed in Drakkar. The smell of that stuff is still strangling to me to this day. I was relieved when Tommy Hilfiger and Calvin’s Obsession replaced Drakkar in popularity.
Anyway… I know all of this has absolutely nothing at all to do with crafts, painting, gardening, etc. But sometimes you find yourself tripping down memory lane and have to share.
Speaking of memory lane- we all signed up to play World of Warcraft again last night. It was odd to log into Arygos after years and see old friends online. So Jora’s back! Or at least wandering aimlessly trying to get her bearings. Lol
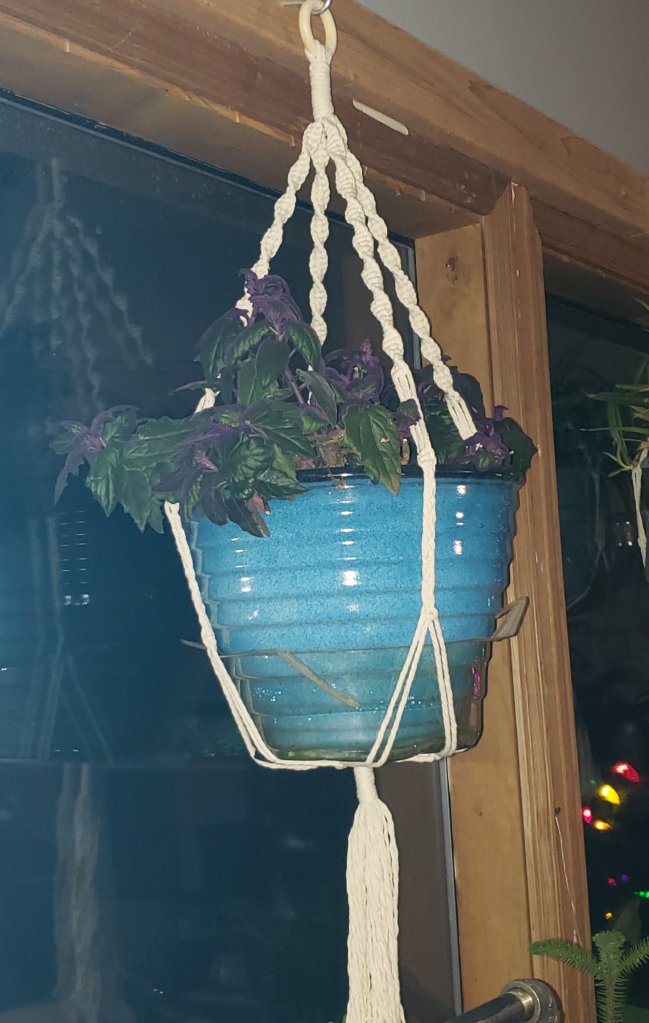
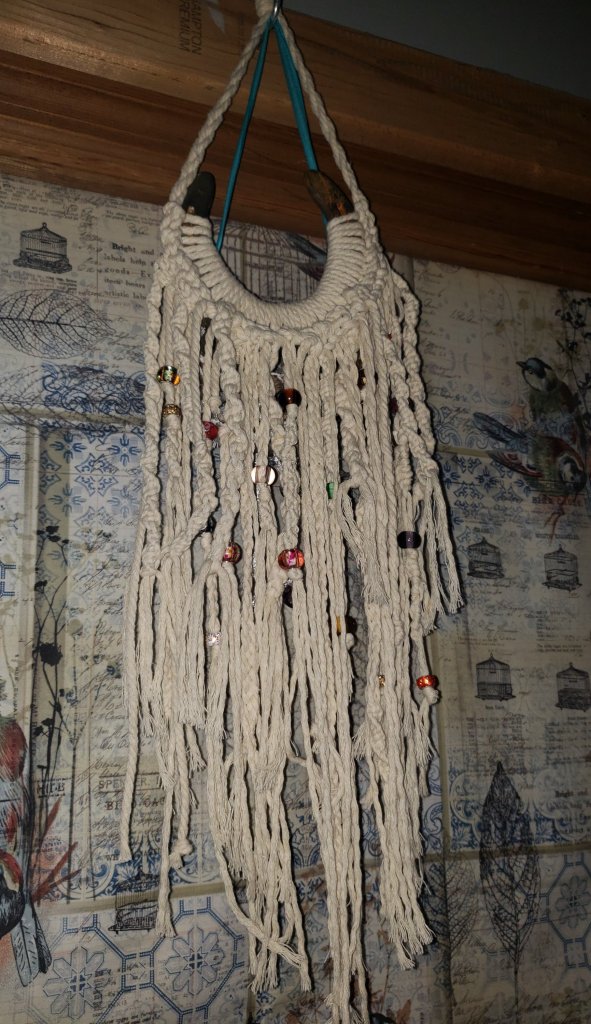
I haven’t done much since Halloween that I’ve deemed post-worthy- a bit of sewing and learned some really basic macrame knots.
I’m not writing a tutorial on this, there are some very good ones on both YouTube and TikTok if you’re looking. For these I learned to do a spiral square knot and a four strand braid.
The horse shoe was a gift from my daughter’s riding instructor. I picked up the cotton cord and wood rings on Amazon. The beads I had leftover from 4-H crafts.
Two rolls of cord got me 5 plant hangers, I used the trimmings and leftovers to make the horse shoe.
Not selling these right now, just wanted to share. I’m probably starting a new painting soon.