Shiny New Toys

It’s seedling time!

I spent a good part of today getting seeds started in the table top greenhouse Mister bought me for Christmas. Together with the HUGE greenhouse he gave me for Valentines’ Day, I’m SET for the season. A man who truly knows where my heart lies… in the dirt. LOL

We’ve been saving up our plastic water bottles for a couple of weeks. Had a whole box full under the kitchen sink- they were starting to overflow the box and roll out on the floor. I’d have to punt water bottles at random while doing dishes or making dinner. I cut the tops off about half-way down and use the bottom portion for planting seeds.

If anyone has any brilliant ideas for a use for these cut-off tops, I’d love to hear it. You can only keep so many about for funnels.

005

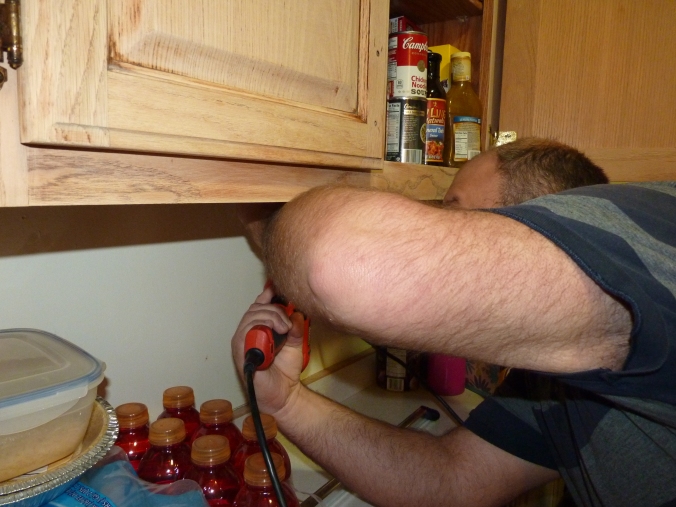
Mister was kind enough to mount a bracket under the cabinet where my table-top greenhouse sits, to hold the grow light in place. It wasn’t a have-to thing with this set up, the photo on the box shows the light sitting directly on top of the greenhouse itself. I feared that it would wind up melting the plastic when left on for a long time or get knocked off and wind up broken. Those grow lights can be expensive! It gives TONS of light, even mounted a couple inches above the box. Much more than the light through the window or the grow bulb I had rigged up the previous year. This was a nice kit- the lid sits up almost a foot high, so the seedlings have plenty of room to grow, there are vents in the top that can be opened and closed. I’m not sure exactly where he got it, but I found one on Amazon that looks very much like this one for around $50, light included: Table Top Seed Starter Kit

There are some really pretty Victorian style ones if you’d rather have something elegant that isn’t plastic. I’m happy with this, it gets the job done, it’s washable and it will do a fabulous job growing strong seedlings. I’ve always had issues with not enough light in the past. Our only window with southern exposure is in our office. It’s tiny, the cats love to knock off the few plants that are in there, it’s not the most optimal place to start seeds. No cats here, it fits on the counter and did I mention… I really love the light. There’s something really inviting about it, like with real sunlight.


I’m doing several different sorts of tomato this year, as I couldn’t decide which I liked best. I have a yellow cherry, a roma, a beefsteak and a roma grape that we’re going to try. I’ve been saving up bell pepper seeds from the peppers we get from the grocery store, they worked fine last year. They aren’t quite true to the original, but actually had a stronger (but still sweet) flavor. Peppers LOVE heat, so I may keep some of those plants in the greenhouse this year and see how they do. We also have a package of carrot seeds that Burpee sent as a free gift. We’ll be starting cucumber and snow peas, but I direct sow those into the garden at planting time instead of starting them in the house. Peas don’t mind a little chill and cucumbers grow extremely fast and produce long before other plants that are direct-sowed.

I use a basic seed starting mix (which is mostly made of peat) to fill the bottles. The reason you use this instead of potting soil is that it’s sterile- meaning there shouldn’t be weed or grass seeds sprouting in it and competing with your plants. Also, it’s very light, fluffy and holds water well, so those frail little starter roots don’t have to fight through heavy dirt to get moving. I filled  over thirty bottles with a single bag.

The Popsicle sticks I saved from ice cream bars. I love these things, they are great for stirring paint, apply glue or plaster, scraping sticky things and work great as plant markers. I just write on the ends with a permanent waterproof marker. The last time I started seeds, I used bendy straws. Whatever you have handy is fine, so long as it’s waterproof and you can write on it. I’ve used bits of foam egg carton, plastic bottle, straws, peeled tree branch, you name it.

010

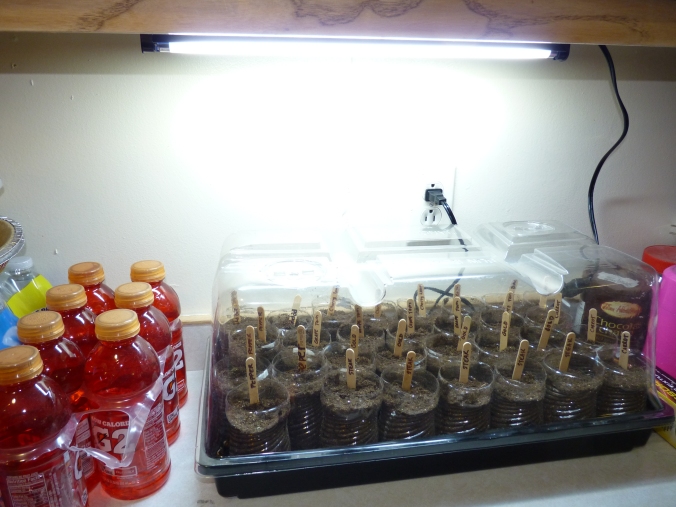
This is the final set-up, all planted and sunning on my counter. I noticed that the the light spreads quite a bit past the sides of the greenhouse. I think I may add a couple more bottles on one side with a  pear and cherry tree seeds I want to play with. If I don’t cut the tops all the way off, they’re like single mini-greenhouses. Might as well take advantage of that light! 🙂

I’ll post more progression pictures as things start to sprout. One note on water- don’t drown your seeds! They only need a bit of a drink to start with, then check them every day to make sure they don’t dry out, but don’t let them just sit in water. It can rot delicate roots very quickly if they get too wet. I don’t have a heat mat under mine, so they don’t get quite very warm and dry out quickly. The clear bottles aren’t organic like peat pots, toilet paper rolls or as convenient maybe as plastic cell flats- but they are really nice for checking on whether the plant needs water at a glance (the peat is darker when it’s wet) and how the roots are coming along. If there are seeds near the side, you can even see them break through the seed coat and sprout. My daughter loves to watch this happen, she thinks it’s amazing.

She helped plant and water all the seeds. She even tagged a couple of the sticks for me. 🙂
She’s a wonderful little garden helper.

I was serious about those water bottle tops. I would love to hear your ideas or suggestions. I hate putting useful stuff in the trash!

-B


Spring Fever

It’s in the upper 60’s today in JANUARY. I have spring fever already! There are seed catalogs pouring in by mail and my husband bought me a table top seed starter for Christmas, so I’m ready to go.
This year we’re starting a couple of new fruit trees, a grape vine, some strawberries and several different types of blueberry. I’ll write more about each of those as I start the projects and get them in the ground.
Today I ordered most of my seed from the three websites that I frequent most. I’ve had good luck with plants from all three of these. Burpee is my favorite and usually sends me the best coupons. The other two tend to carry unusual things that Burpee doesn’t, like special hybrids and a larger selection of fruit trees. I like to browse the paper catalogs and then order online. You can get to their websites at BurpeeGurneys and Jung Seed.

I garden in Zone 6, in Mid-Missouri. Our last frost date is about the end of April. I usually begin seeds indoors sometime in mid-late February for plants that I’ll be starting inside. Last year, we went on vacation in early May, which is when I usually start putting in my garden, so I waited until we got back to start things. Direct sowing in Mid-May was fine, I didn’t hit frost or lose any plants, but some things we planted took SO LONG to produce that the season was almost over before we saw anything from the plants. The watermelon we planted didn’t produce watermelons until almost September. It was late July before we saw tomatoes.
I have a lot of patience, but I have to admit, direct sowing really tested it last year. So it’s back to seed starting inside for me. I usually start at least peppers and tomatoes inside, so that the plants are almost a foot tall before being transplanted outside in late April or the first of May. The cucumbers and peas I’ll direct sow; they grow SUPER fast, so they don’t really need that extra couple months to get a jump on the season.
While I wait for the ground to warm up, I’ll spend nice days finishing my fence and starting some new hugelkultur mounds for the fruit trees and grapes. I’m also going to be doing some landscaping around our picnic table/firepit.
I’m off to enjoy this weather while it lasts, looks like we’re back to snow next week!

Enjoy shopping and planning those spring gardens! That groundhog had better not see his shadow Tuesday, or I’ll be gunning for the little sucker. 😉

-Belle

Gardeners, Start Your Seedlings!

My seed packets came in the mail today that I ordered a little less than two weeks ago; soon it will be time to get some of these plants started indoors.
Most seed companies like Burpee, Gurneys or Burgess are fairly first-time-gardener friendly in that they print planting and care instructions on every seed packet that they send out. You can often find additional information on their website for specific planting information in your growing zone  ( Link is to basic explanation, map to follow below). I live in North Central Missouri, most of which is in Zone 5b; however, the Lake Area is in a micro-climate area of Zone 6. This is according to the older maps; sometimes the newer maps show all but the northernmost part of Missouri in Zone 6. What this means in layman’s terms is that in Zone 6, my garden should be safe from a hard freeze by mid-May. tomatoseedlings
I was surprised at the amount of misinformation I found about seed starting on sites like Yahoo Answers. I followed the question, “When should I start my tomato seeds indoors if I live in Zone 6?” Several people, professing to be garden centers and/or professional gardeners advised this person NOT to start tomato plants indoors, but to wait until they could be planted directly in the garden instead. One of the responses actually read, “Don’t plant them indoors because they are incredibly likely to die. What you want to do is plant them outside in mid-May to early June when lots of sunlight is available.” Another answer advised them to wait until July! Seriously folks, that’s a bit ridiculous.
Yes. Tomato plants need a lot of light. If you aren’t lucky enough to have a big bay window with sunlight for 8-10 hours a day like I am, then you may need grow lights to supplement your seedlings. Without enough light, the plants will become leggy, which means the stalks will be spindly and they’ll fall over a lot. Tomato and pepper plants need about 8 weeks to germinate. Most seed companies will recommend you start them in sterile planting medium, like those pete flats you see in garden centers this time of year. Last year, I started mine in milk jugs, then transplanted to 16 oz. plastic water bottles with the tops cut off. I used ordinary potting soil. I put them on trays in the window and watered them whenever the top was dry to touch or when I could see that the soil looked dry partway down. The nice thing about clear plastic containers is you can actually SEE whether the soil needs water or not; another advantage is that you can see the root growth on your plants. They were the perfect size for giving a couple plants away to family also.
I also saw a suggestion on Pinterest to use toilet paper tubes stuffed with soil. The pin claimed that you could plant these directly in the garden since they are biodegradable. I haven’t personally tried this out yet, my concern with it is that that the tubes would start to fall apart before you were ready to transplant them and you’d have a mess. Maybe if you stuffed them close together in a shallow plastic crate (as they were shown in the pin photo) and were careful not to overwater…

This timetable for starting indoor seedlings will allow about 8 weeks for seeds to germinate and for your plants to reach a good transplant size before being moved to the garden.

Zones 9 & 10: Start seeds indoors in early to mid January
Zone 8: Start seeds indoors in early February
Zone 7: Start seeds indoors in mid February
Zone 6: Start seeds indoors in late February
Zone 5: Start seeds indoors in early March
Zones 1-4: Start seeds indoors in mid to late March

Tomato seedlings will emerge in about 7-10 days. Most peppers take longer, about 10-21 days. Some of my peppers took so long last year, I was beginning to worry that the seeds were duds and weren’t going to do anything. Then they took off and caught up to my tomatoes in a week. Onion sets should be started indoors now through mid-late February. You let these grow to about 5-6 inches tall, repeatedly cut the tops to about 3 inches until they are ready transplant; the cutting will help strengthen the root and health of the onions.

This map shows the hardiness zones and projected last frost dates for most of the United States.

FrostZones

Not all seeds should be started indoors and transplanted like tomatoes and peppers. Some should be direct-sowed in the garden; again check the labels on your seed packets for best planting times. Crops such as broccoli, most lettuces and greens, carrots and onions can be started in early spring in your garden, so long as the soil is workable. These plants benefit from the cool nights and are harvested before the warmest part of the summer season, they are early summer and late fall crops. I’m going to start half of my seeds in mid to late February and save the other half for August/September for a fall crop. Both lettuce and broccoli plants will bolt when the sun gets hot. Bolting means the plant is getting ready to flower; this often changes the flavor of the plant when it forms the flower stalk and makes it no longer edible. Some lettuce varieties are described as “Slow to bolt,” which means they will last longer in warm weather.  Most carrot varieties can also be planted early, when danger of heavy frost has passed.

For crops like cucumber and corn that are direct-sown, Zone 6 gardeners are probably safe to plant in early to mid-May. I started my cucumbers last year before we went on vacation, which was the week of May 8th. When we got back from our trip, I had plants!  🙂
Melons and squash can also be planted in Zone 6 in mid-late May through June. Beans and peas should be started in June/July when the soil temperature is warm. This is also when you should plant your heat tolerant herbs like sage, thyme, oregano and basil. If you stagger your bean plantings every couple of weeks through August, you can have beans well up until frost. This will also help spread out the yields, so you aren’t overwhelmed with tons of beans at once.

September plantings of garlic will be ready to harvest in the coming spring. Spinach is also a great plant for September that loves the cooler weather up until hard frost. This is of course, a very generalized overview. I’ll be posting some articles on specific plants and their care soon, along with some things I’ve tried that have worked out well. Even though it’s snowing today and the wind chill is around 10F, I’m still getting the gardening bug. I’ll post photos of my flats when they are started and in their sunny window.
-B

Winter Gardening

I prefer winter and fall, when you feel the bone structure of the landscape- the loneliness of it, the dead feeling of winter. Something waits beneath it, the whole story doesn’t show. – Andrew Wyeth

IcyTreesWait a minute… winter gardening? What is there to do besides read gardening books and wait for spring to arrive? Unless you’re hibernating with the bears, there’s plenty you can do during the winter months to get you ready for spring planting.

Like the above quote suggests, winter is an excellent time to really take a look at the bone structure of your garden. Like the bones in a face, your garden’s foundation will show through, support and give shape to everything layered on top of it. Architectural elements support the greenery, flowers and fruits of spring and summer.

Moderate winter days are a great time to walk about your yard and consider your  landscape  plan for the coming year. Is a too large plant overwhelming a small space? Does a certain spot lack interest, need repairs or maybe additional WinterBonessupport?
Now is the time to plan and take care of it, before the area is covered in vigorous growth and becomes an issue in the middle of your busy growing season.

If you’re hiring a  landscaper this year; schedules tend to be less chaotic during the winter months and you can set up your installs for early spring, before the rush begins.

If you haven’t already; clean and sharpen your garden tools, clear out junk in the shed, pick up extra gloves and start browsing those seed catalogs. When I can’t get outside during icy or especially cold spells, I love to shop and plan for what I’ll be doing when it does warm up a bit. Seeds may arrive as soon as early February for starting indoors- 8 weeks or so before the last frost. Order early so you can avoid delays and get the best selection!

I like to prune and clean out brushy areas on mild winter days. It’s much easier to see the underlying structure of a tree without leaves blocking half your view. Also, pruning during the cold months helps protect trees from contracting some fungal diseases and pest issues that are prevalent during the wet spring or hot summer months.  Our red-oaks are prone to oak wilt in this area- the disease is dormant in below freezing temperatures and MUCH  less likely to be passed from tree to tree through infected wood or cause stress to a tree susceptible to infection.

icedberryIf the plant flowers in spring, wait until after it finishes blooming to prune. Vigorous winter pruning of a spring blooming plant means it won’t bloom again until next spring; already, there are small, tight buds forming on several of my blooming shrubs and trees. The early bloomers, like forsythia, burning bush, saucer magnolia (a cold-hearty cousin to the trees in the South) and wisteria shouldn’t be pruned or cut back until they finish flowering in mid to late spring. Pruning may be especially necessary to trees following ice storms or heavy snows, due to broken branches.

Make a date with your soil. If you’ve never had a soil analysis done, the tests are relatively inexpensive and getting results now will give you plenty of time to learn about what amendments to add when the soil becomes workable in spring. County extension offices should be able to direct you to soil testing labs; some may even provide free testing.

Spring clean your window space as soon as those holiday displays are stored away. Growing seedlings need ample light, and warmth to be ready for spring planting. Make room for this temporary garden space before your seeds and sets arrive.icicles

You can still amend garden beds for spring, if you didn’t do it in the fall. I’ve been adding cardboard to various areas of my yard and garden since December. Don’t work the soil if it’s frozen or too wet, you can damage the structure. What you can do is add coffee grounds, tea grounds, egg shells, cardboard and leaves until the compost pile begins to warm and the soil isn’t frozen solid. This will give you a jump start on enriching the nitrogen and calcium in your beds as well as helping to warm the soil faster when the snow and ice finally exit stage left.

I’ve also read that a thick layer of cardboard in the fall/winter months can all but eliminate the need to till or weed a garden plot before planting in spring. I covered our beds in late fall with a layer of cardboard and black weed barrier that I could easily remove when I’m ready to start moving seedlings outside. This is my first year trial, so I can’t vouch yet personally for its success. I’ll be sure to post comments or updates this spring when I find out.

Happy planning folks, don’t forget to oil up those shotguns in case Mister Groundhog sees his shadow next week! 😛
-Belle